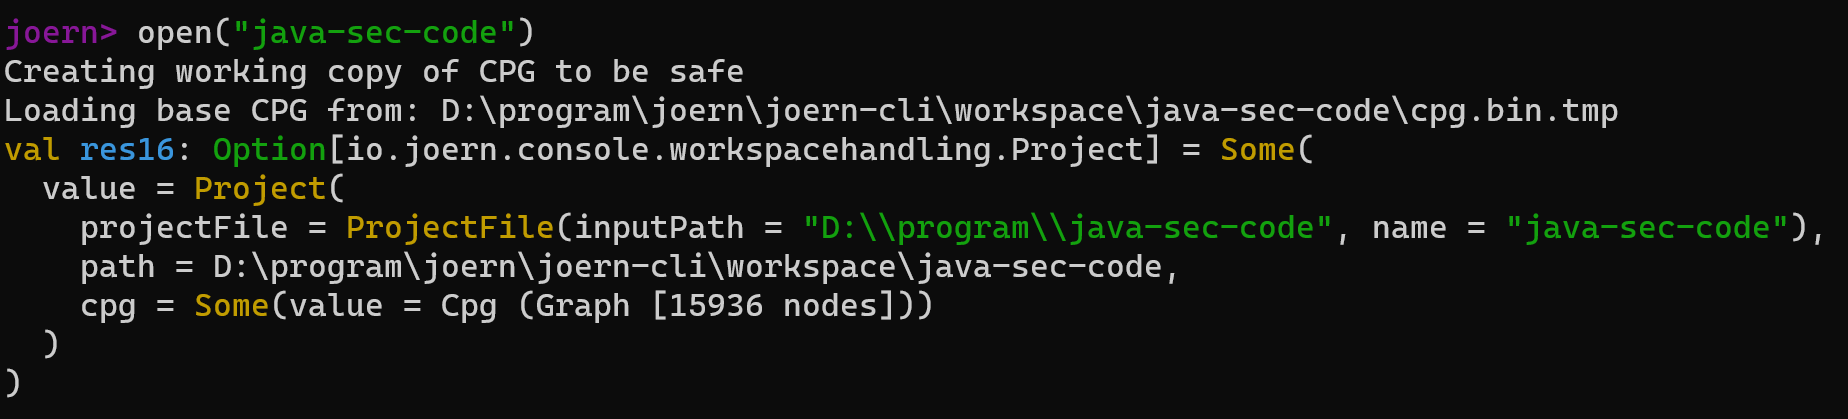
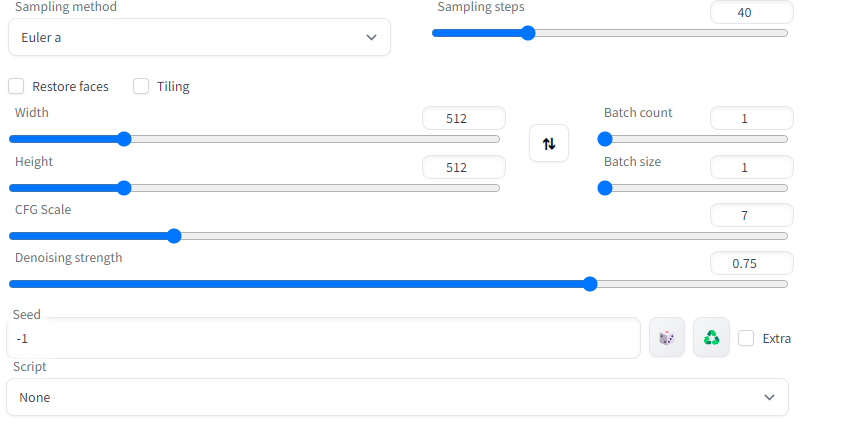
1
| (((deformed))), blurry, bad anatomy, disfigured, poorly drawn face, mutation, mutated, (extra_limb), (ugly), (poorly drawn hands), fused fingers, messy drawing, broken legs censor, censored, censor_bar, multiple breasts, (mutated hands and fingers:1.5), (long body :1.3), (mutation, poorly drawn :1.2), black-white, bad anatomy, liquid body, liquidtongue, disfigured, malformed, mutated, anatomical nonsense, text font ui, error, malformed hands, long neck, blurred, lowers, low res, bad anatomy, bad proportions, bad shadow, uncoordinated body, unnatural body, fused breasts, bad breasts, huge breasts, poorly drawn breasts, extra breasts, liquid breasts, heavy breasts, missingbreasts, huge haunch, huge thighs, huge calf, bad hands, fused hand, missing hand, disappearing arms, disappearing thigh, disappearing calf, disappearing legs, fusedears, bad ears, poorly drawn ears, extra ears, liquid ears, heavy ears, missing ears, fused animal ears, bad animal ears, poorly drawn animal ears, extra animal ears, liquidanimal ears, heavy animal ears, missing animal ears, text, ui, error, missing fingers, missing limb, fused fingers, one hand with more than 5 fingers, one hand with less than5 fingers, one hand with more than 5 digit, one hand with less than 5 digit, extra digit, fewer digits, fused digit, missing digit, bad digit, liquid digit, colorful tongue, blacktongue, cropped, watermark, username, blurry, JPEG artifacts, signature, 3D, 3D game, 3D game scene, 3D character, malformed feet, extra feet, bad feet, poorly drawnfeet, fused feet, missing feet, extra shoes, bad shoes, fused shoes, more than two shoes, poorly drawn shoes, bad gloves, poorly drawn gloves, fused gloves, bad cum, poorly drawn cum, fused cum, bad hairs, poorly drawn hairs, fused hairs, big muscles, ugly, bad face, fused face, poorly drawn face, cloned face, big face, long face, badeyes, fused eyes poorly drawn eyes, extra eyes, malformed limbs, more than 2 nipples, missing nipples, different nipples, fused nipples, bad nipples, poorly drawnnipples, black nipples, colorful nipples, gross proportions. short arm, (((missing arms))), missing thighs, missing calf, missing legs, mutation, duplicate, morbid, mutilated, poorly drawn hands, more than 1 left hand, more than 1 right hand, deformed, (blurry), disfigured, missing legs, extra arms, extra thighs, more than 2 thighs, extra calf,fused calf, extra legs, bad knee, extra knee, more than 2 legs, bad tails, bad mouth, fused mouth, poorly drawn mouth, bad tongue, tongue within mouth, too longtongue, black tongue, big mouth, cracked mouth, bad mouth, dirty face, dirty teeth, dirty pantie, fused pantie, poorly drawn pantie, fused cloth, poorly drawn cloth, badpantie, yellow teeth, thick lips, bad camel toe, colorful camel toe, bad asshole, poorly drawn asshole, fused asshole, missing asshole, bad anus, bad pussy, bad crotch, badcrotch seam, fused anus, fused pussy, fused anus, fused crotch, poorly drawn crotch, fused seam, poorly drawn anus, poorly drawn pussy, poorly drawn crotch, poorlydrawn crotch seam, bad thigh gap, missing thigh gap, fused thigh gap, liquid thigh gap, poorly drawn thigh gap, poorly drawn anus, bad collarbone, fused collarbone, missing collarbone, liquid collarbone, strong girl, obesity, worst quality, low quality, normal quality, liquid tentacles, bad tentacles, poorly drawn tentacles, split tentacles, fused tentacles, missing clit, bad clit, fused clit, colorful clit, black clit, liquid clit, QR code, bar code, censored, safety panties, safety knickers, beard, furry, pony, pubic hair, mosaic, futa, testis, (((deformed))), blurry, bad anatomy, disfigured, poorly drawn face, mutation, mutated, (extra_limb), (ugly), (poorly drawn hands), fused fingers, messy drawing, broken legs censor, censored, censor_bar, multiple breasts, (mutated hands and fingers:1.5), (long body :1.3), (mutation, poorly drawn :1.2), black-white, bad anatomy, liquid body, liquidtongue, disfigured, malformed, mutated, anatomical nonsense, text font ui, error, malformed hands, long neck, blurred, lowers, low res, bad anatomy, bad proportions, bad shadow, uncoordinated body, unnatural body, fused breasts, bad breasts, huge breasts, poorly drawn breasts, extra breasts, liquid breasts, heavy breasts, missingbreasts, huge haunch, huge thighs, huge calf, bad hands, fused hand, missing hand, disappearing arms, disappearing thigh, disappearing calf, disappearing legs, fusedears, bad ears, poorly drawn ears, extra ears, liquid ears, heavy ears, missing ears, fused animal ears, bad animal ears, poorly drawn animal ears, extra animal ears, liquidanimal ears, heavy animal ears, missing animal ears, text, ui, error, missing fingers, missing limb, fused fingers, one hand with more than 5 fingers, one hand with less than5 fingers, one hand with more than 5 digit, one hand with less than 5 digit, extra digit, fewer digits, fused digit, missing digit, bad digit, liquid digit, colorful tongue, blacktongue, cropped, watermark, username, blurry, JPEG artifacts, signature, 3D, 3D game, 3D game scene, 3D character, malformed feet, extra feet, bad feet, poorly drawnfeet, fused feet, missing feet, extra shoes, bad shoes, fused shoes, more than two shoes, poorly drawn shoes, bad gloves, poorly drawn gloves, fused gloves, bad cum, poorly drawn cum, fused cum, bad hairs, poorly drawn hairs, fused hairs, big muscles, ugly, bad face, fused face, poorly drawn face, cloned face, big face, long face, badeyes, fused eyes poorly drawn eyes, extra eyes, malformed limbs, more than 2 nipples, missing nipples, different nipples, fused nipples, bad nipples, poorly drawnnipples, black nipples, colorful nipples, gross proportions. short arm, (((missing arms))), missing thighs, missing calf, missing legs, mutation, duplicate, morbid, mutilated, poorly drawn hands, more than 1 left hand, more than 1 right hand, deformed, (blurry), disfigured, missing legs, extra arms, extra thighs, more than 2 thighs, extra calf,fused calf, extra legs, bad knee, extra knee, more than 2 legs, bad tails, bad mouth, fused mouth, poorly drawn mouth, bad tongue, tongue within mouth, too longtongue, black tongue, big mouth, cracked mouth, bad mouth, dirty face, dirty teeth, dirty pantie, fused pantie, poorly drawn pantie, fused cloth, poorly drawn cloth, badpantie, yellow teeth, thick lips, bad camel toe, colorful camel toe, bad asshole, poorly drawn asshole, fused asshole, missing asshole, bad anus, bad pussy, bad crotch, badcrotch seam, fused anus, fused pussy, fused anus, fused crotch, poorly drawn crotch, fused seam, poorly drawn anus, poorly drawn pussy, poorly drawn crotch, poorlydrawn crotch seam, bad thigh gap, missing thigh gap, fused thigh gap, liquid thigh gap, poorly drawn thigh gap, poorly drawn anus, bad collarbone, fused collarbone, missing collarbone, liquid collarbone, strong girl, obesity, worst quality, low quality, normal quality, liquid tentacles, bad tentacles, poorly drawn tentacles, split tentacles, fused tentacles, missing clit, bad clit, fused clit, colorful clit, black clit, liquid clit, QR code, bar code, censored, safety panties, safety knickers, beard, furry, pony, pubic hair, mosaic, futa, testis
|


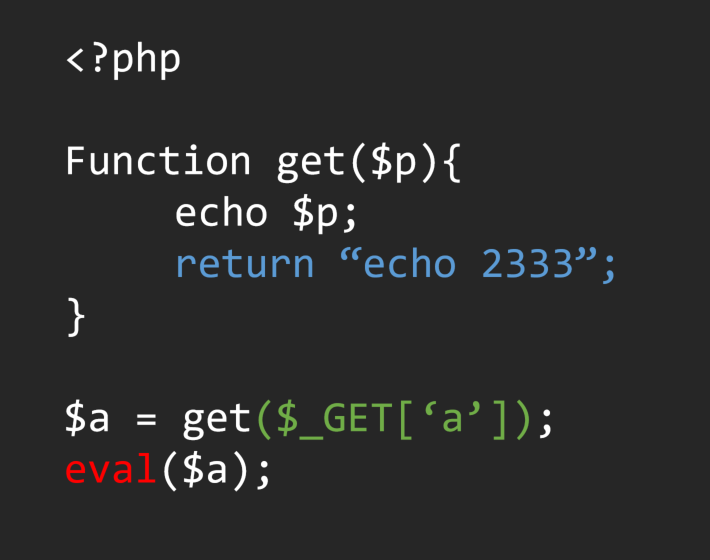
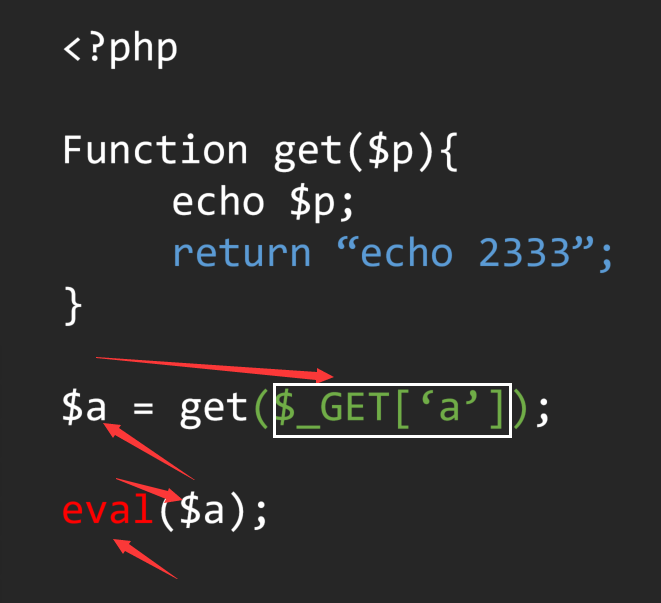

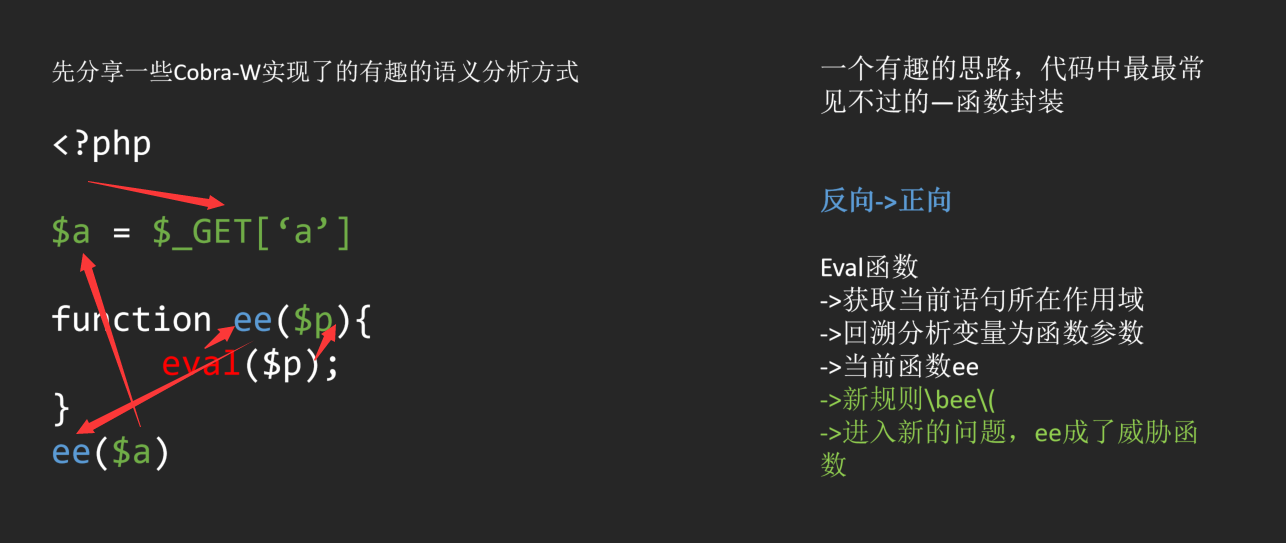
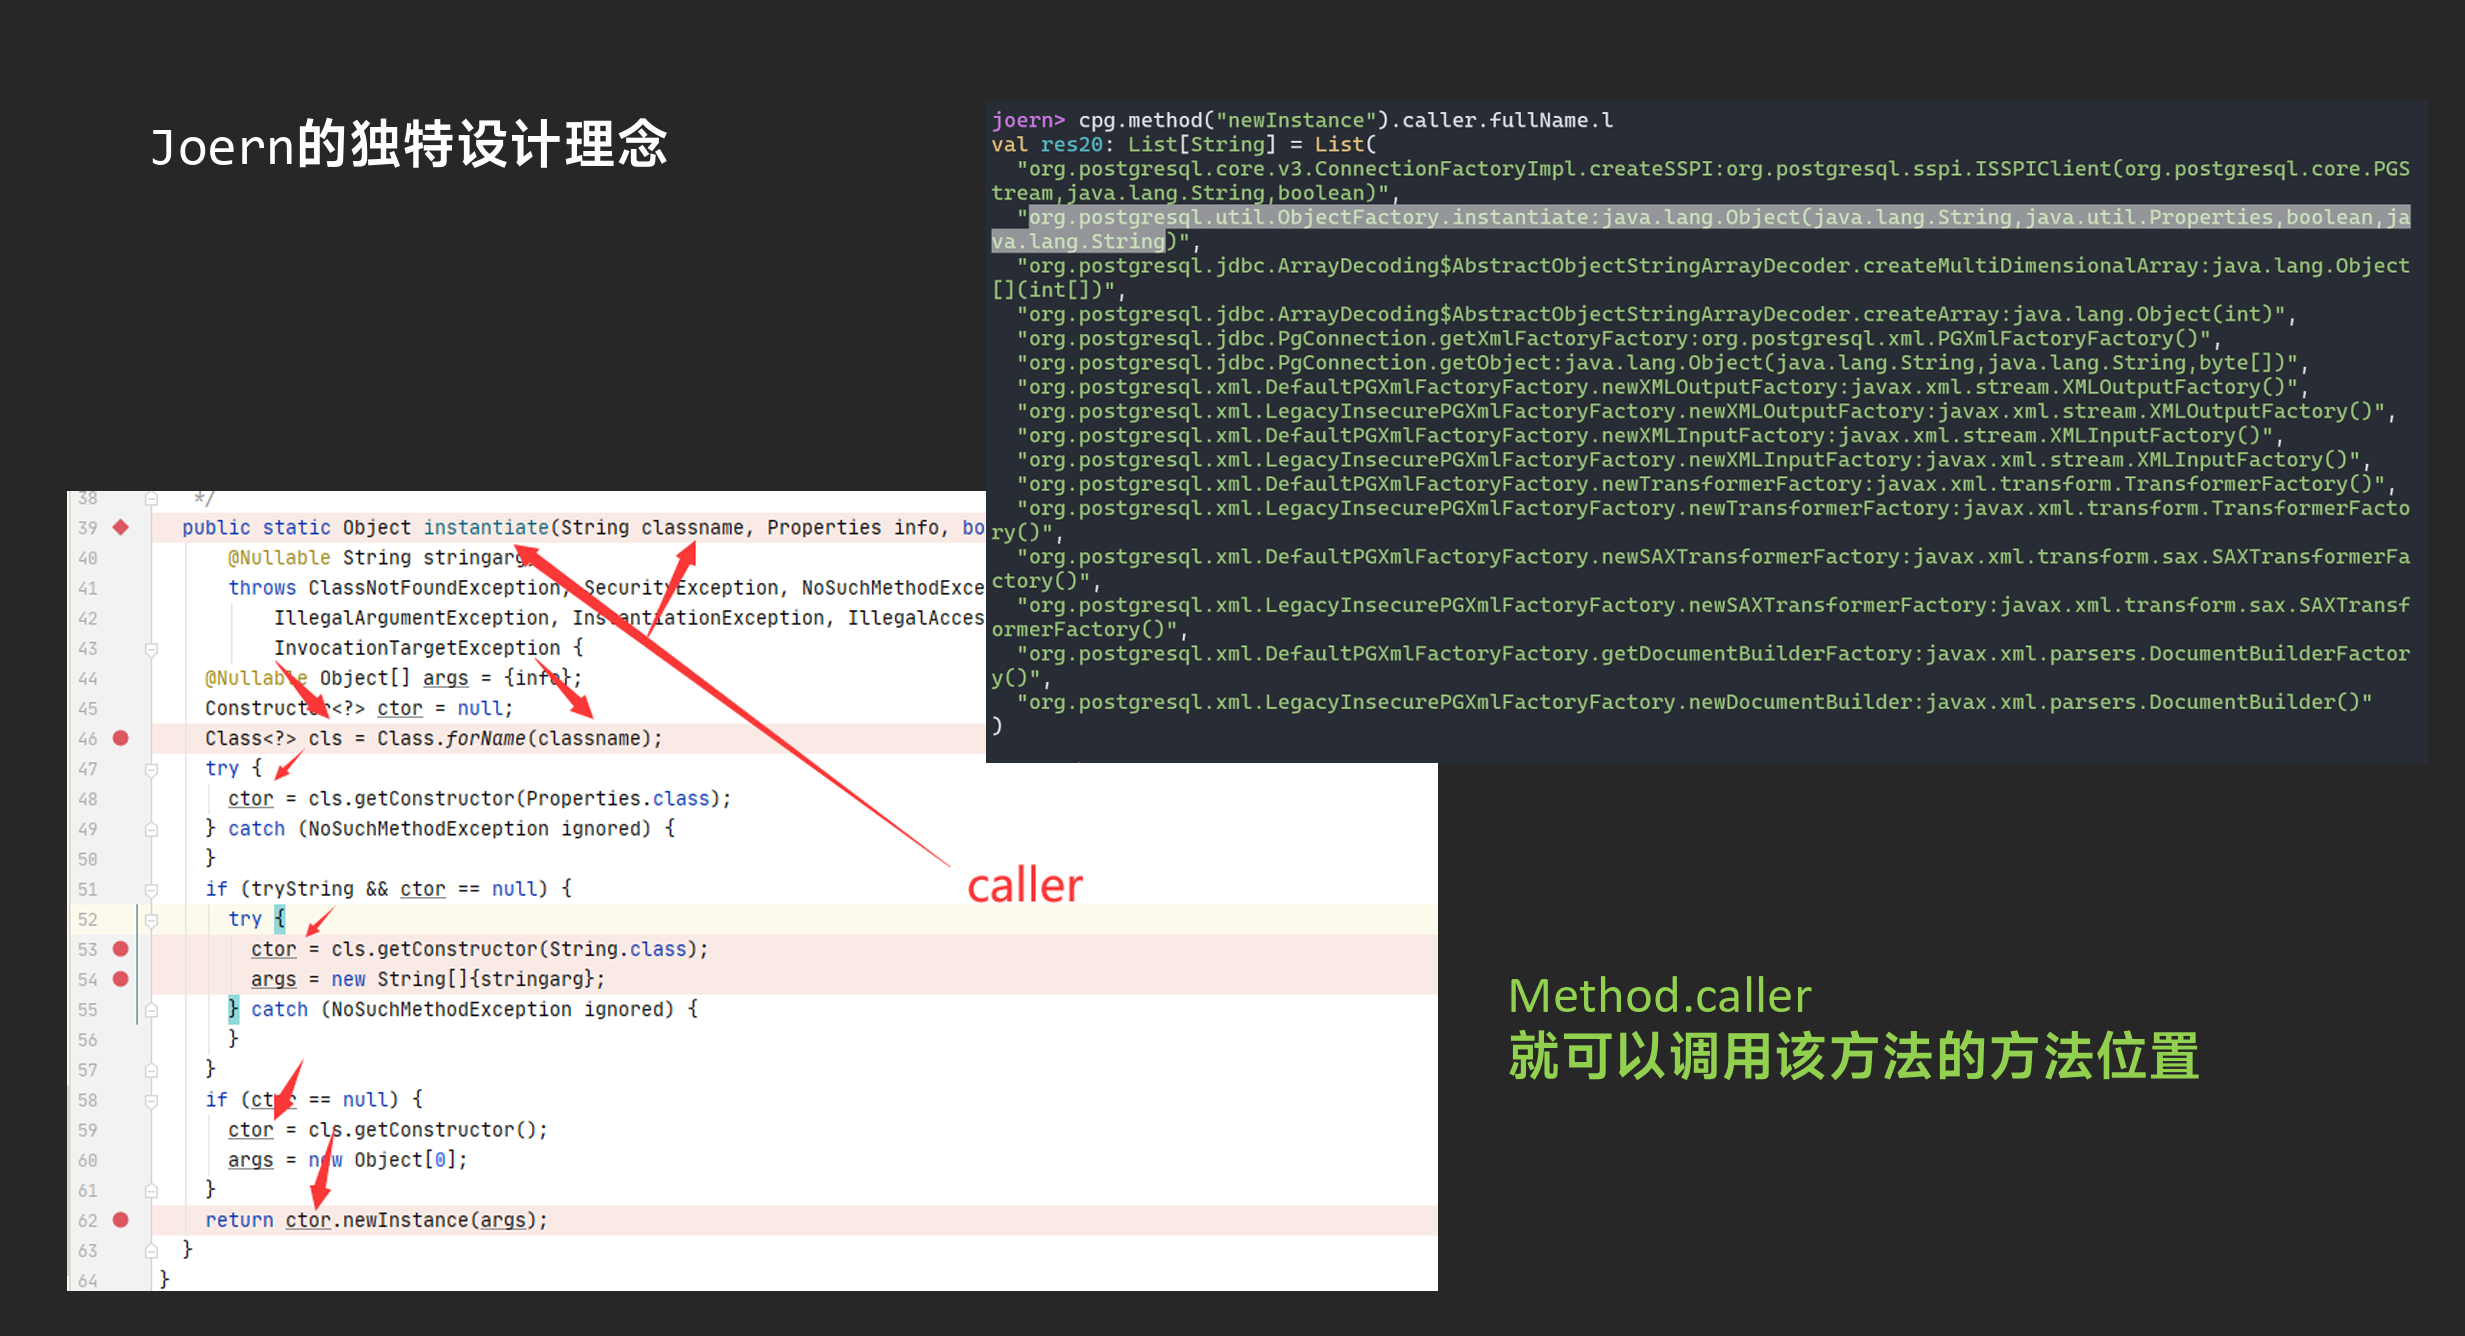


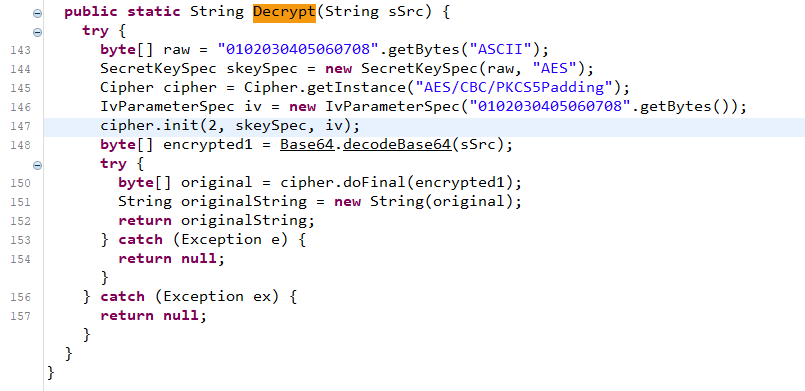


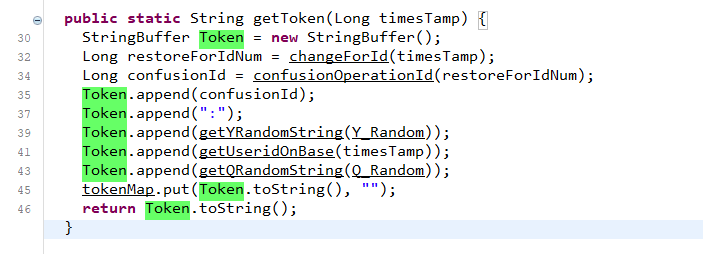


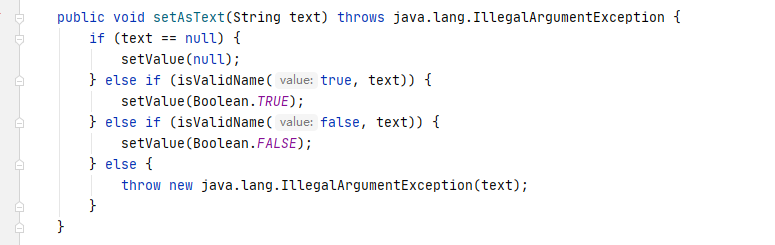
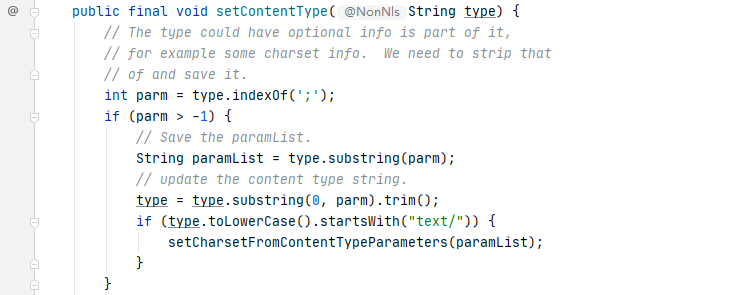
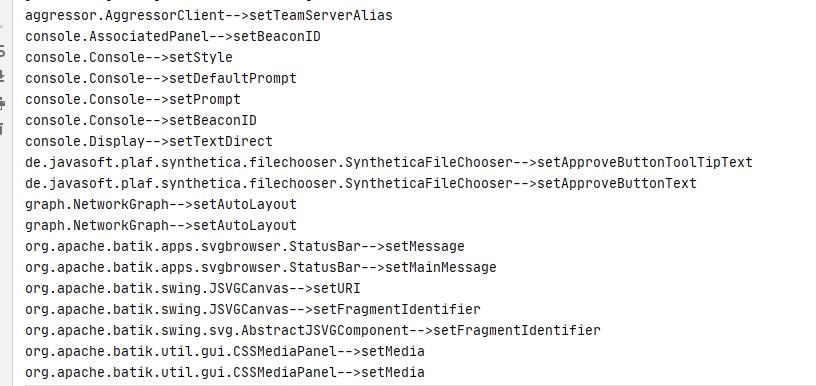
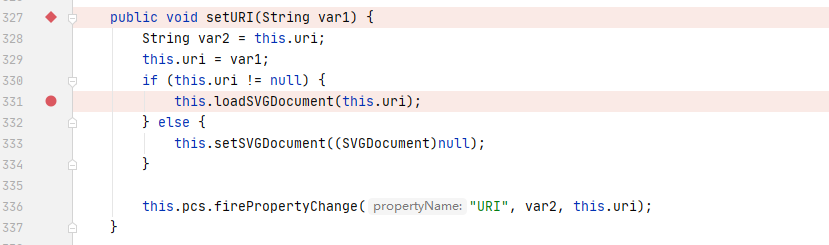
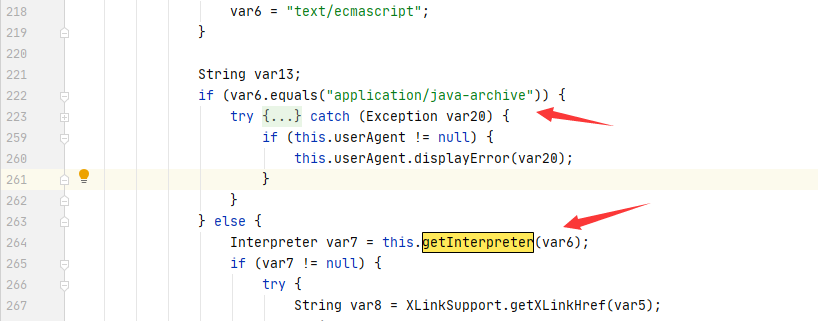
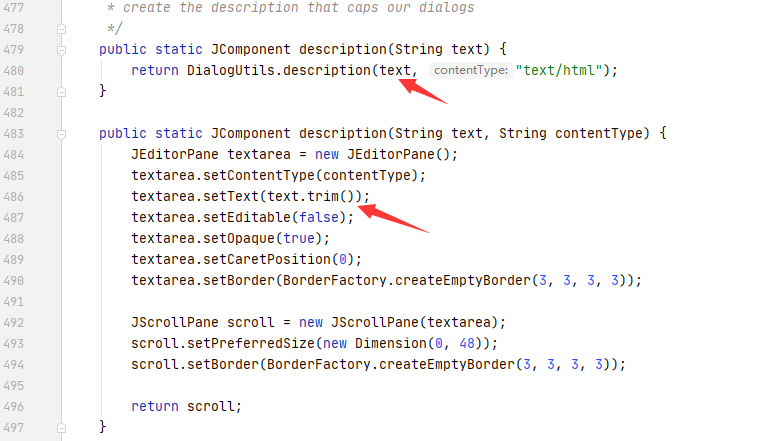
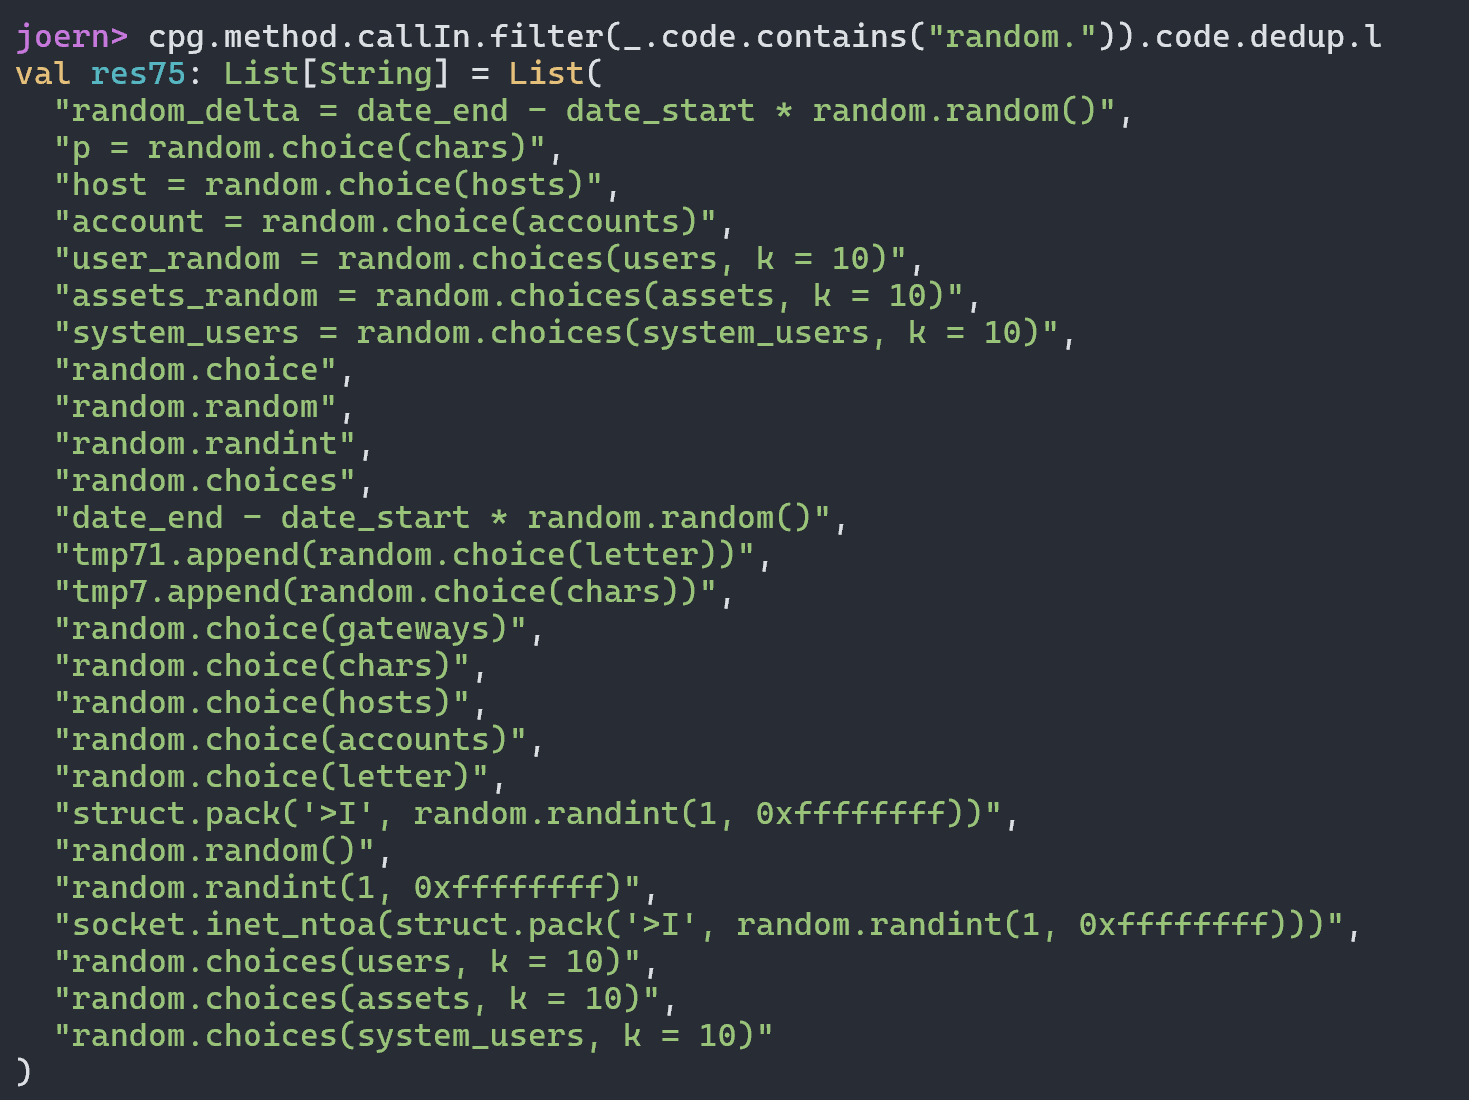
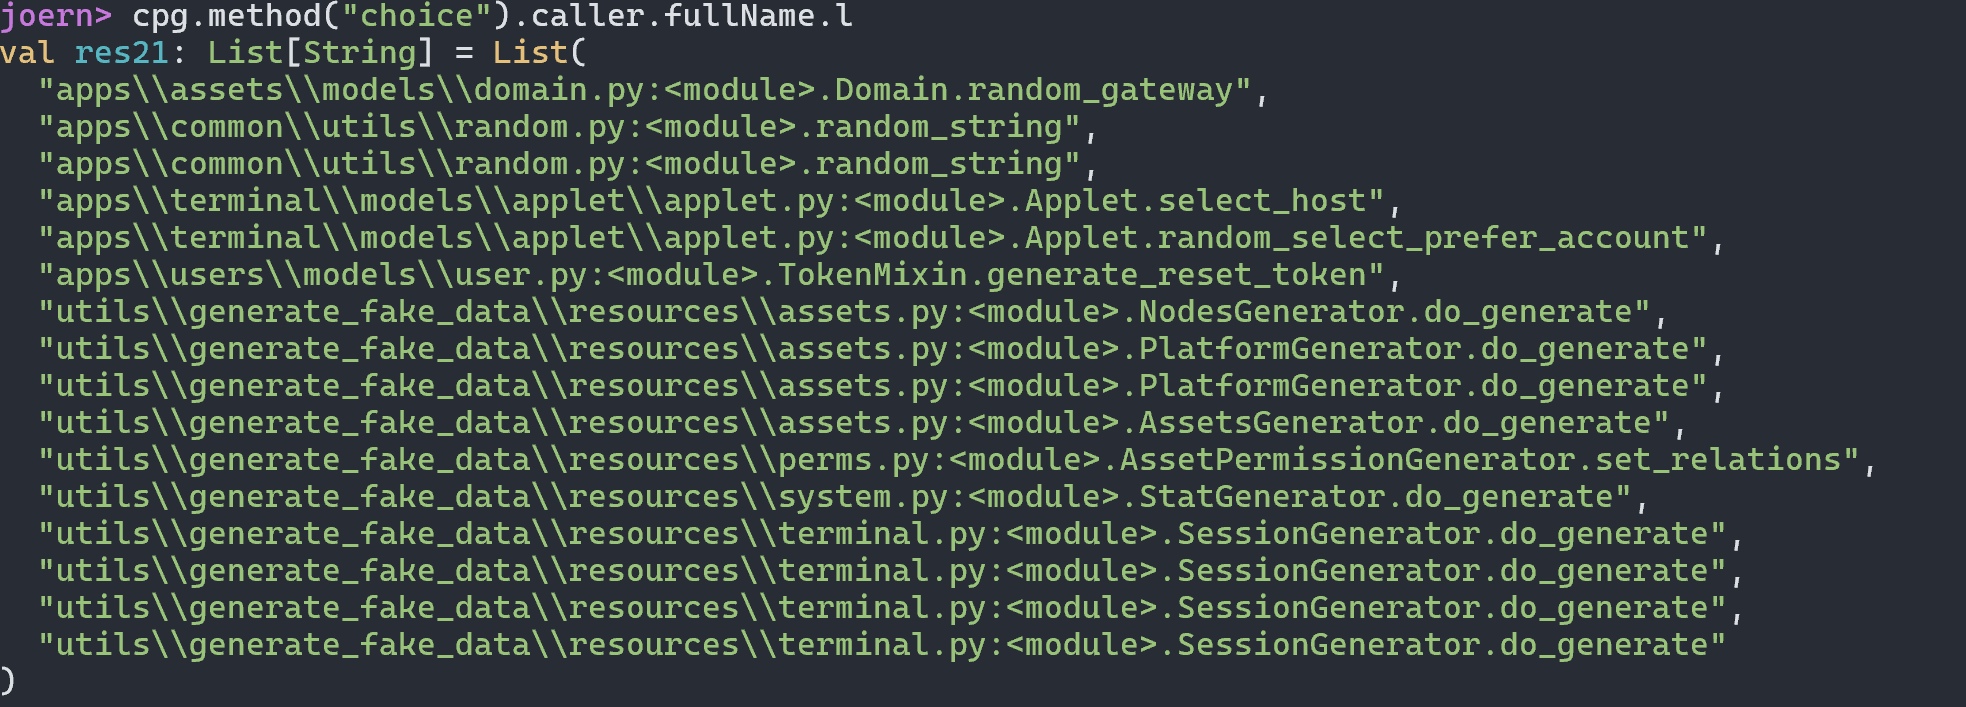
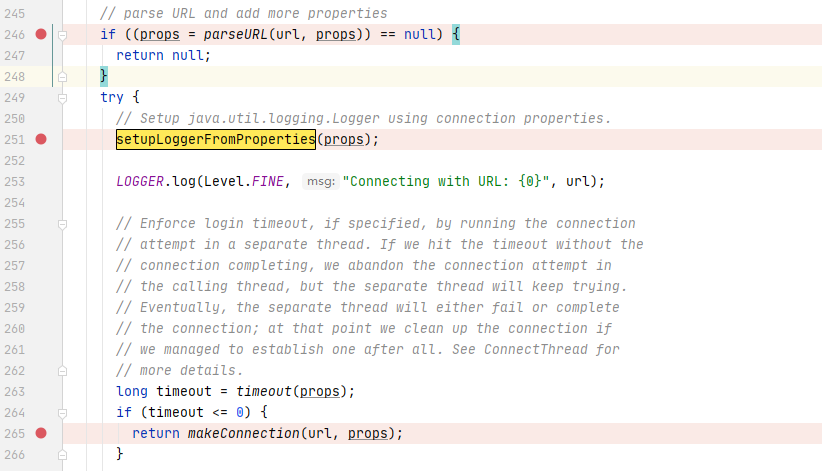
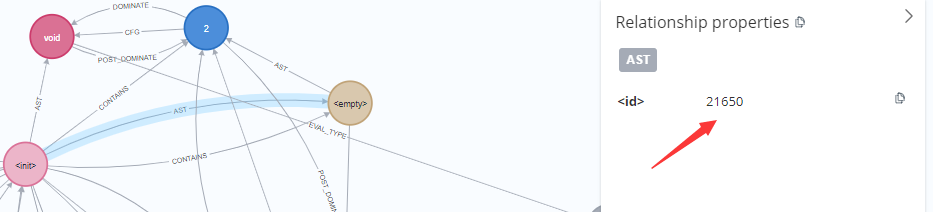
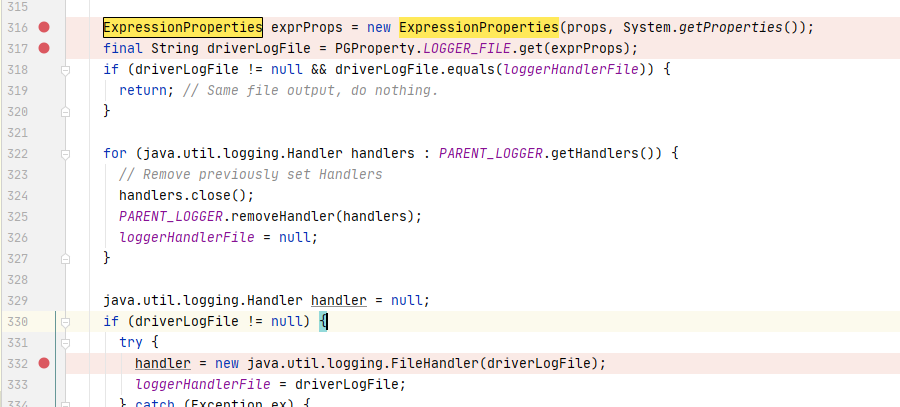
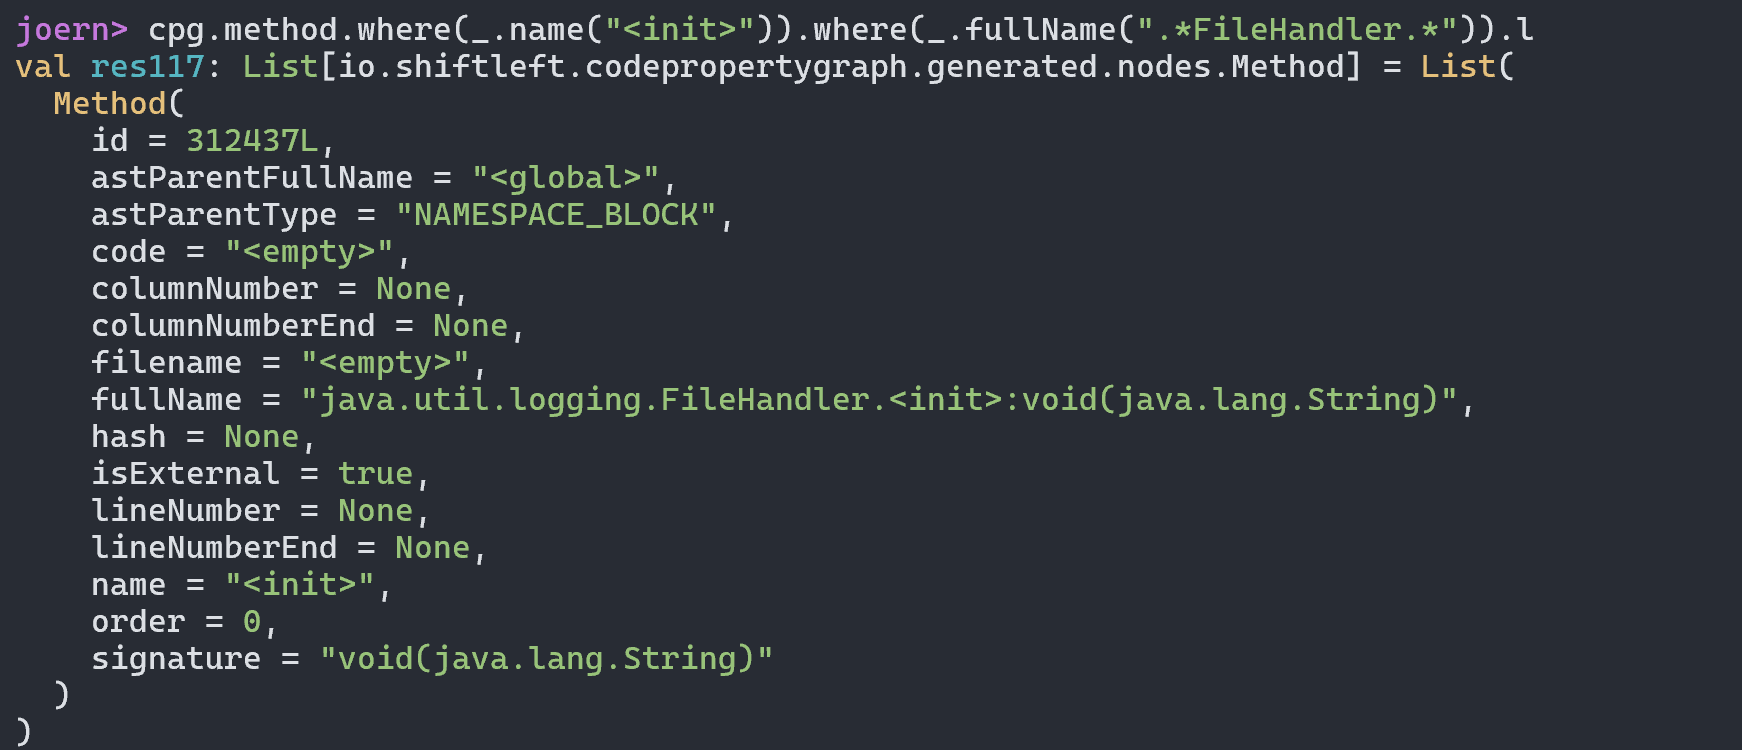
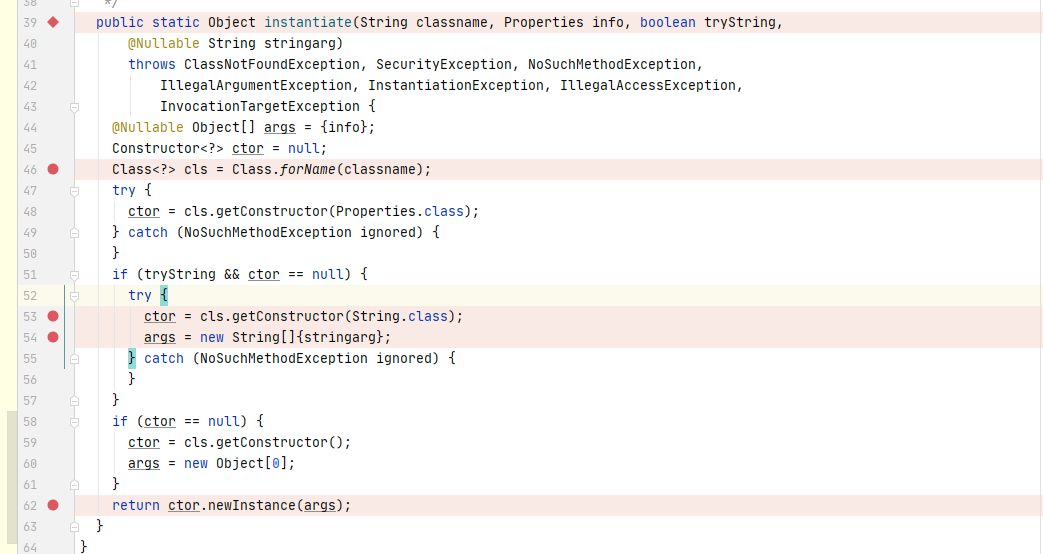
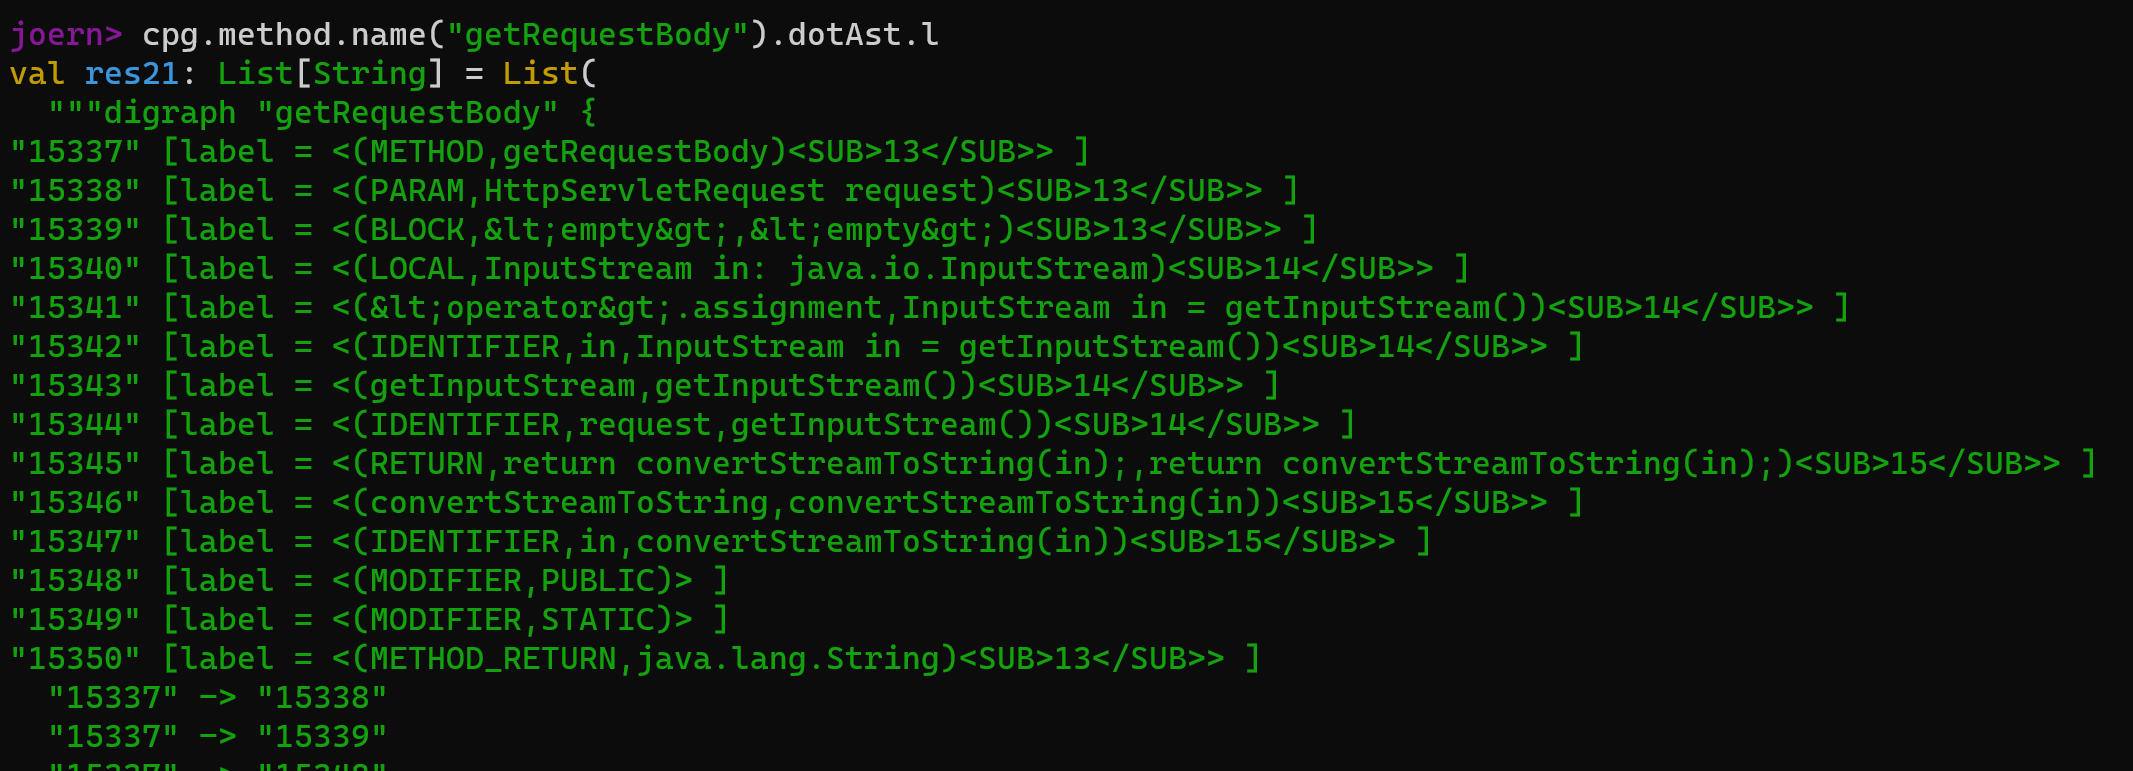
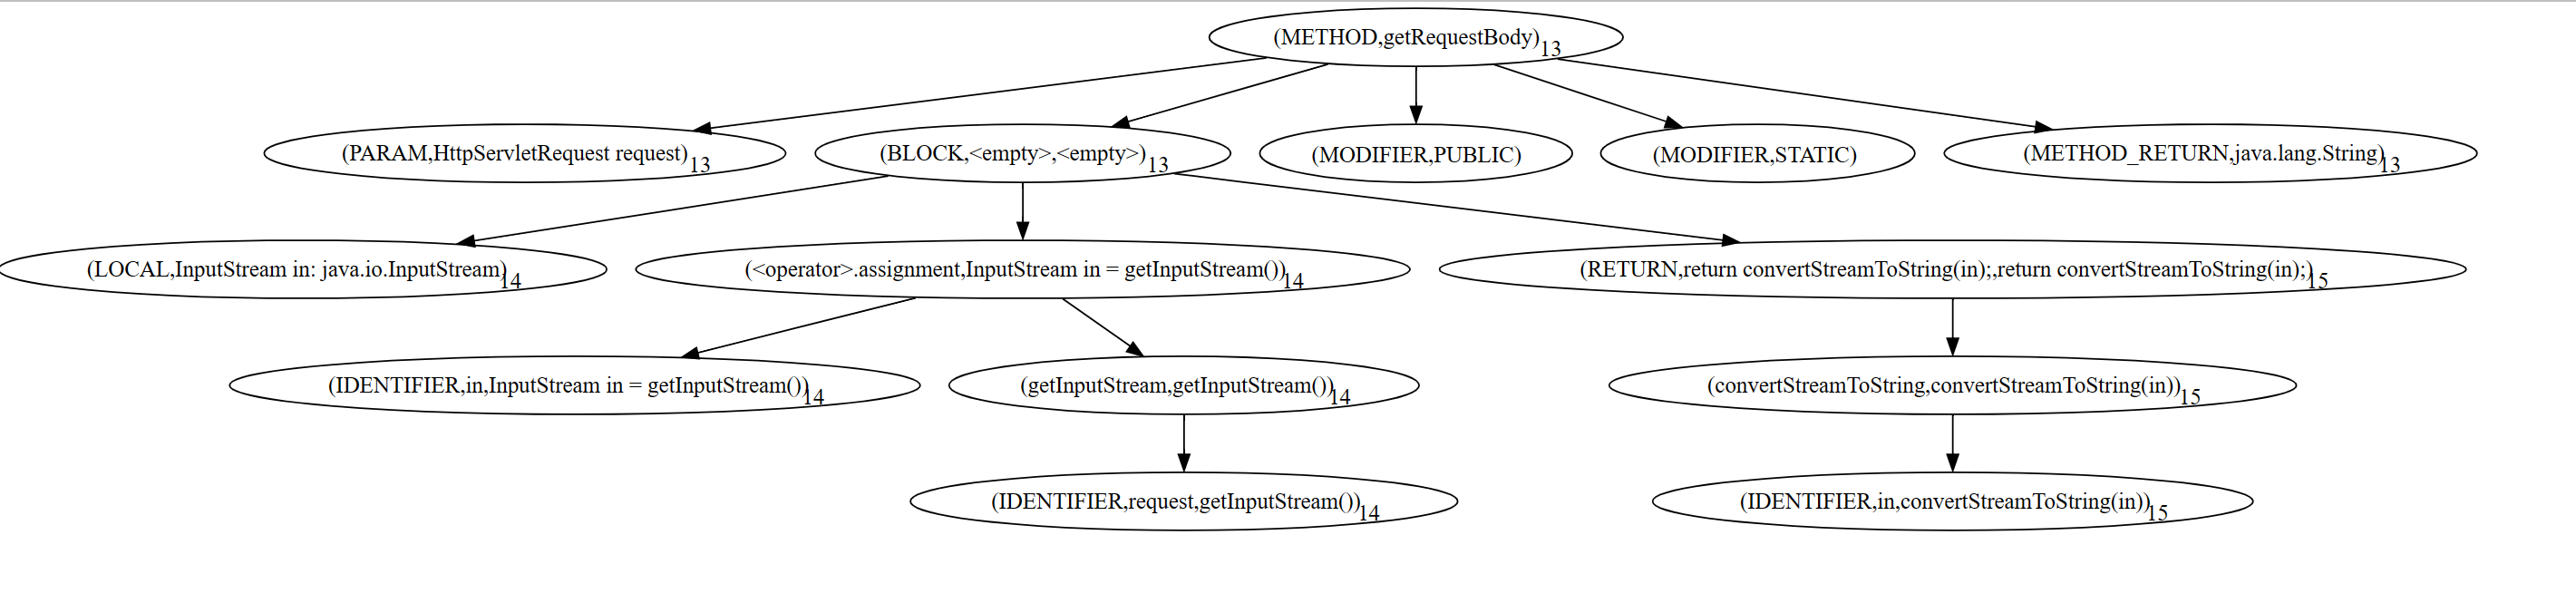
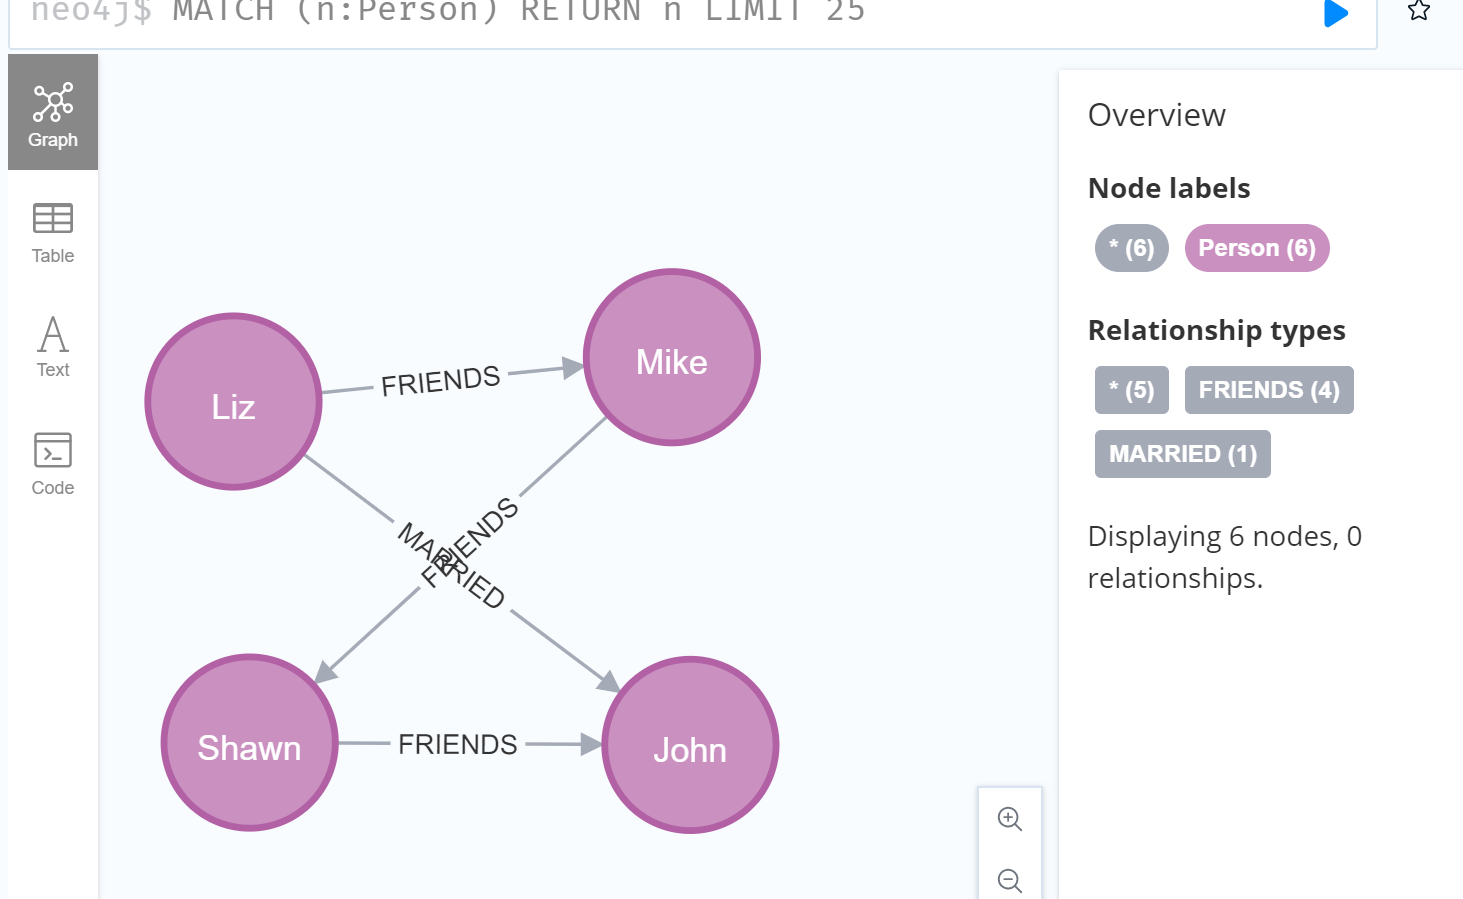
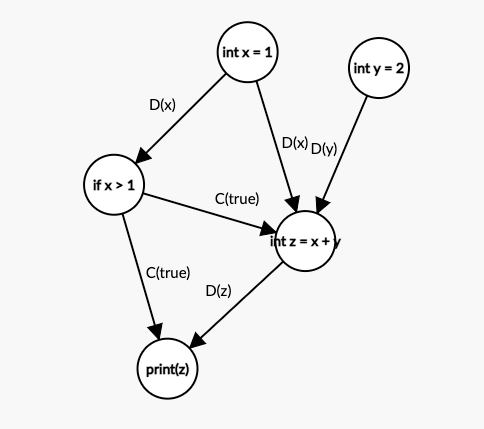
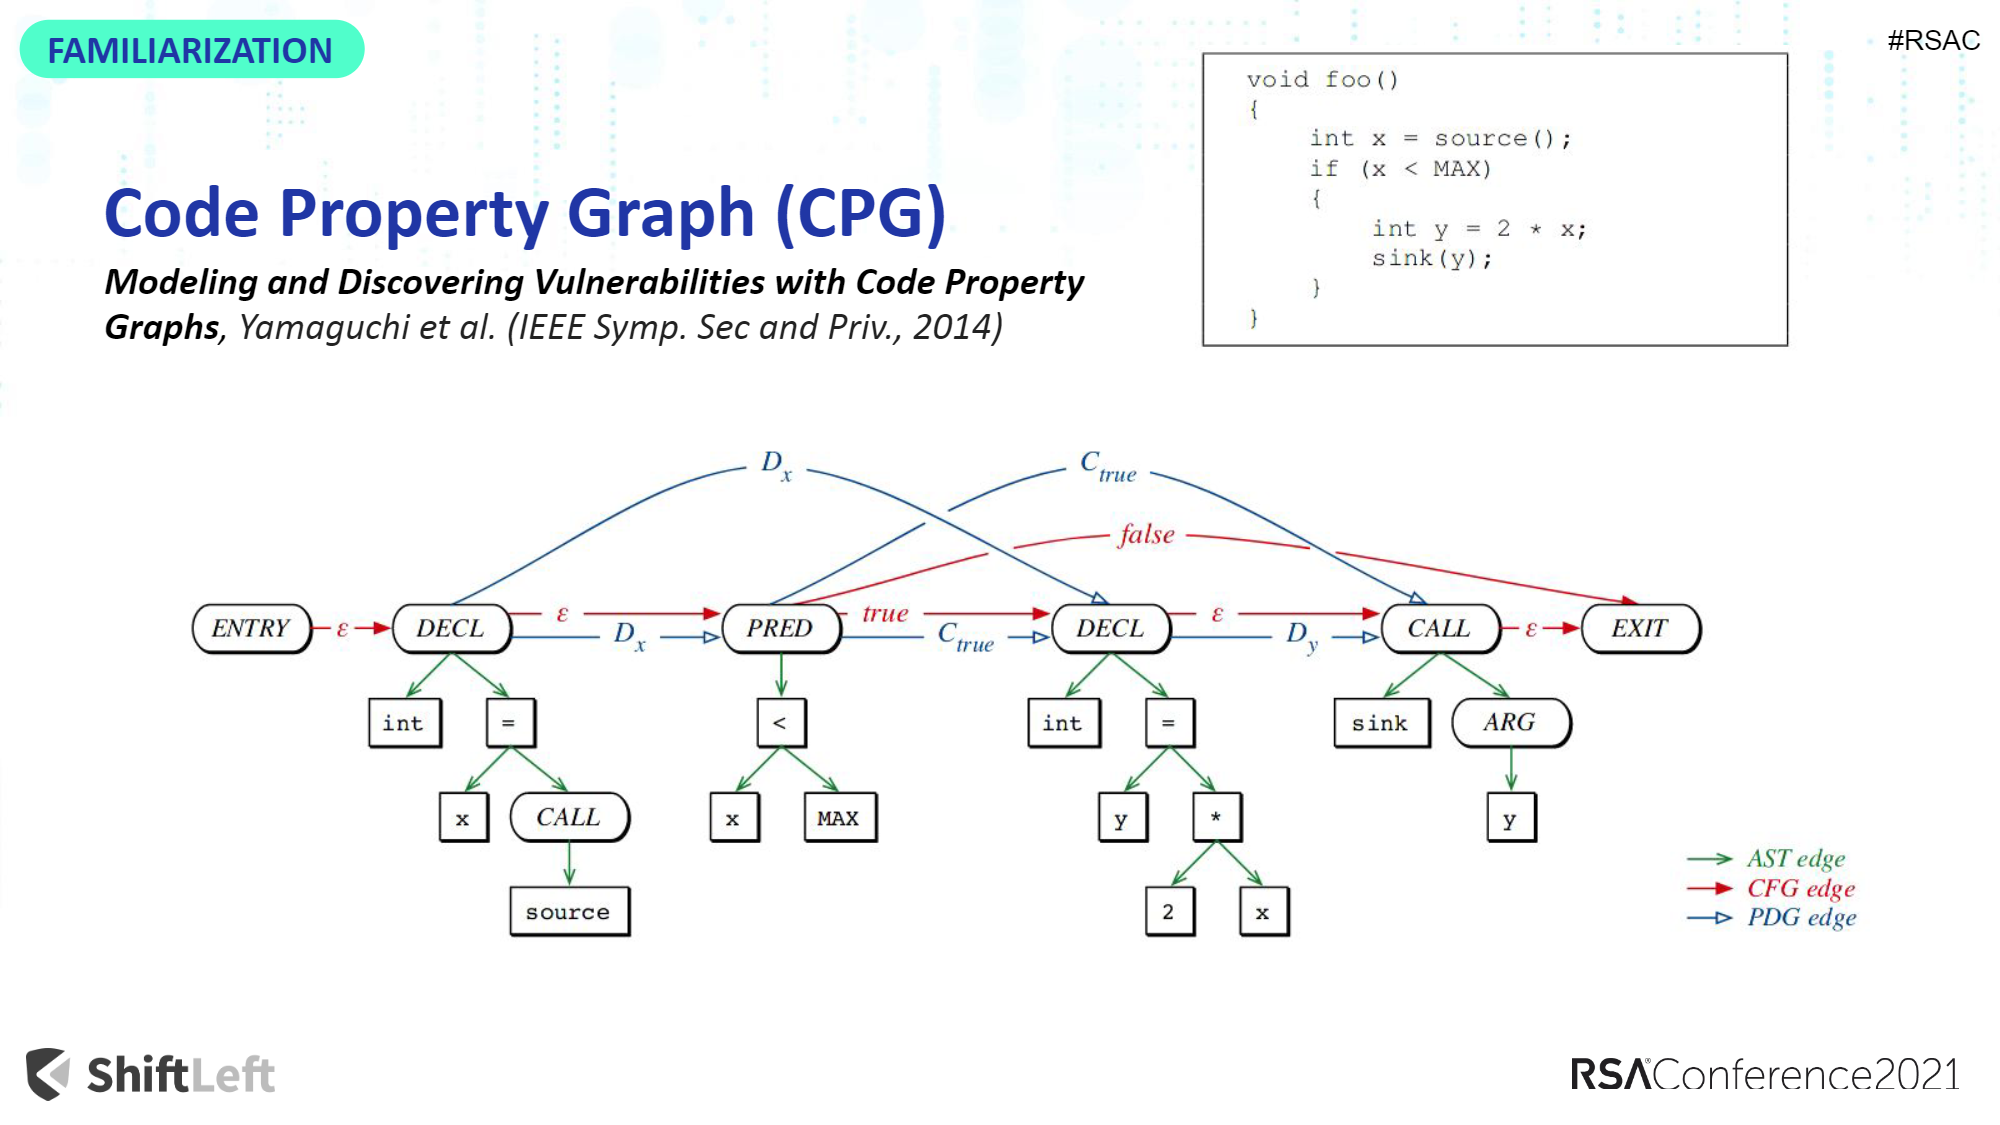
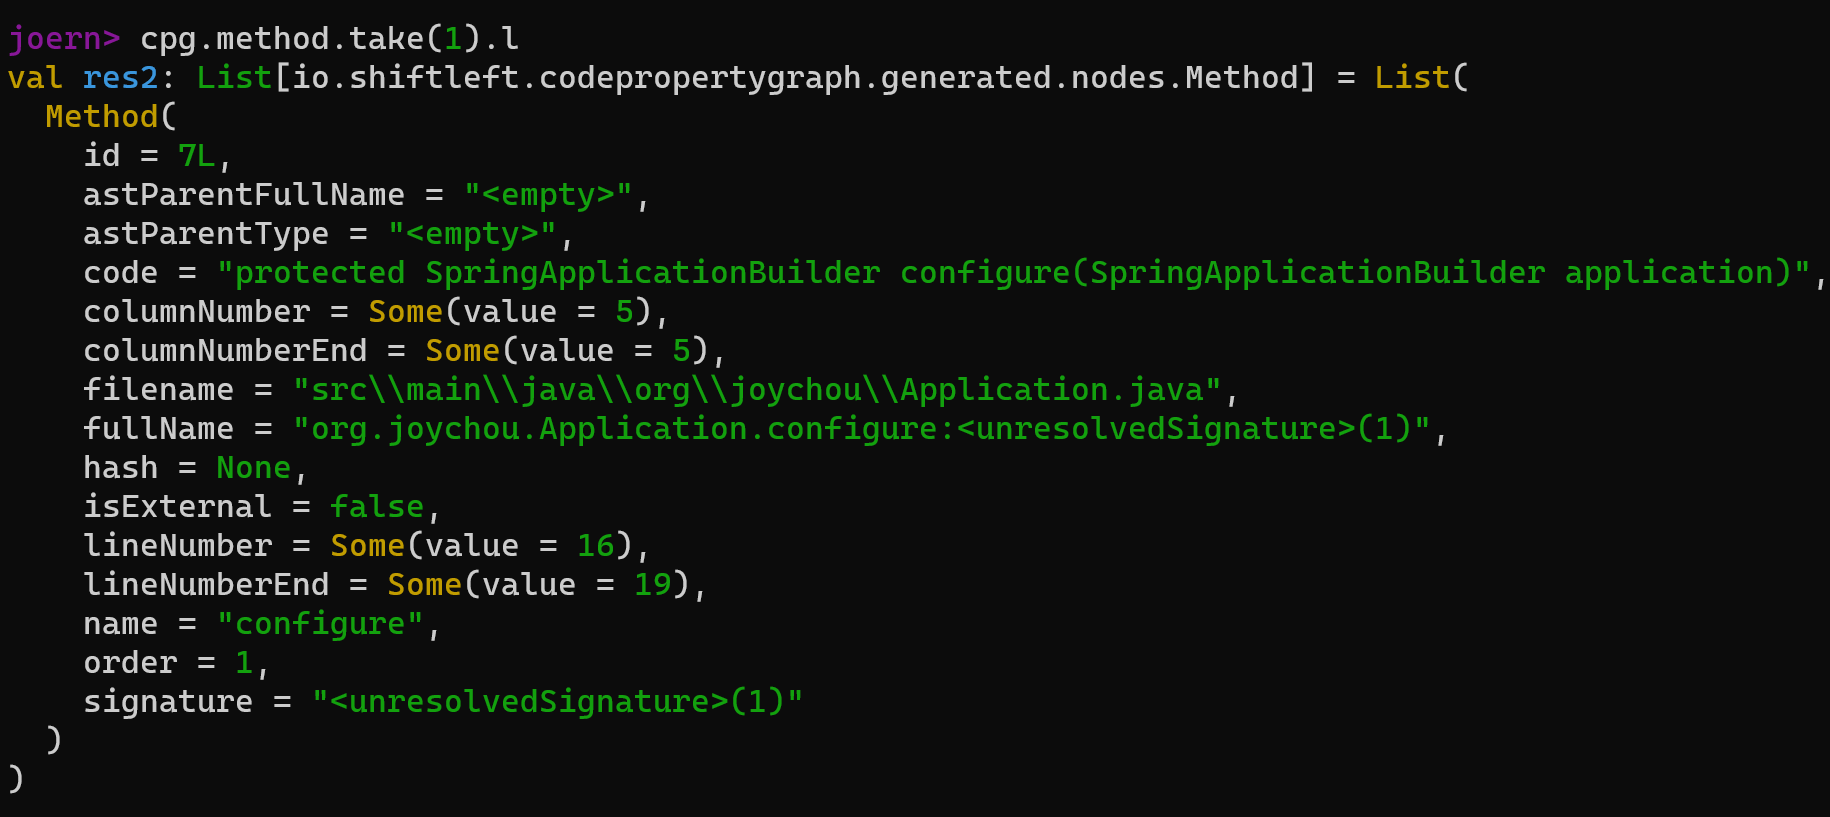
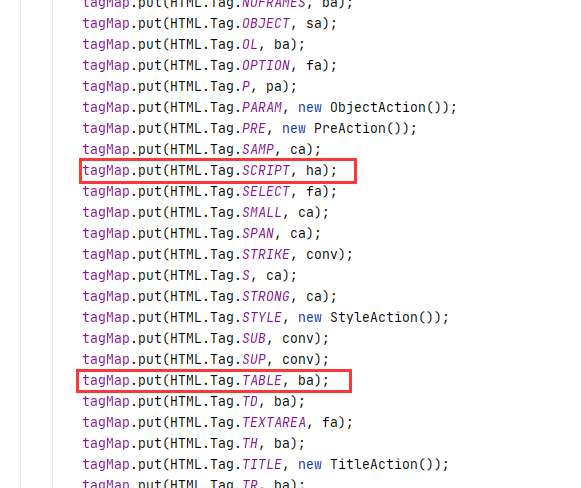
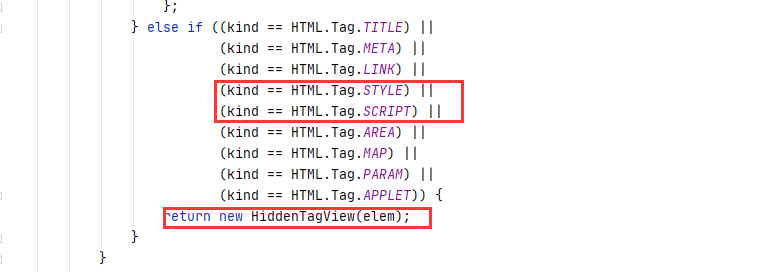
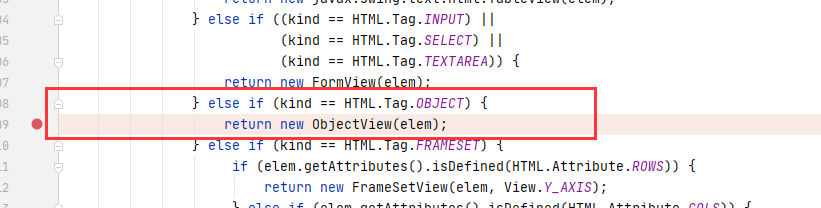
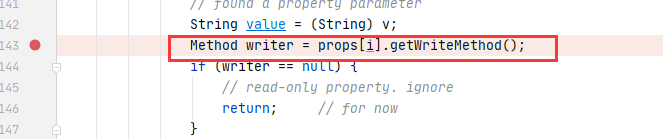
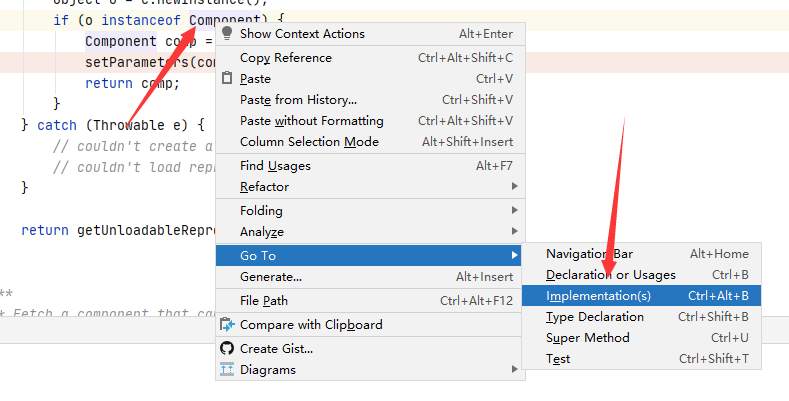
 我们可以直接向上找到对应的函数方法定义位置
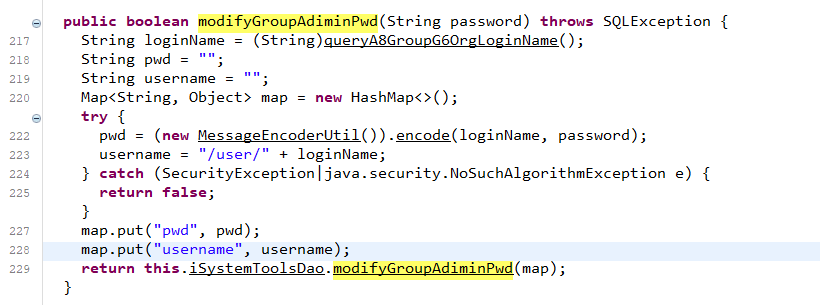
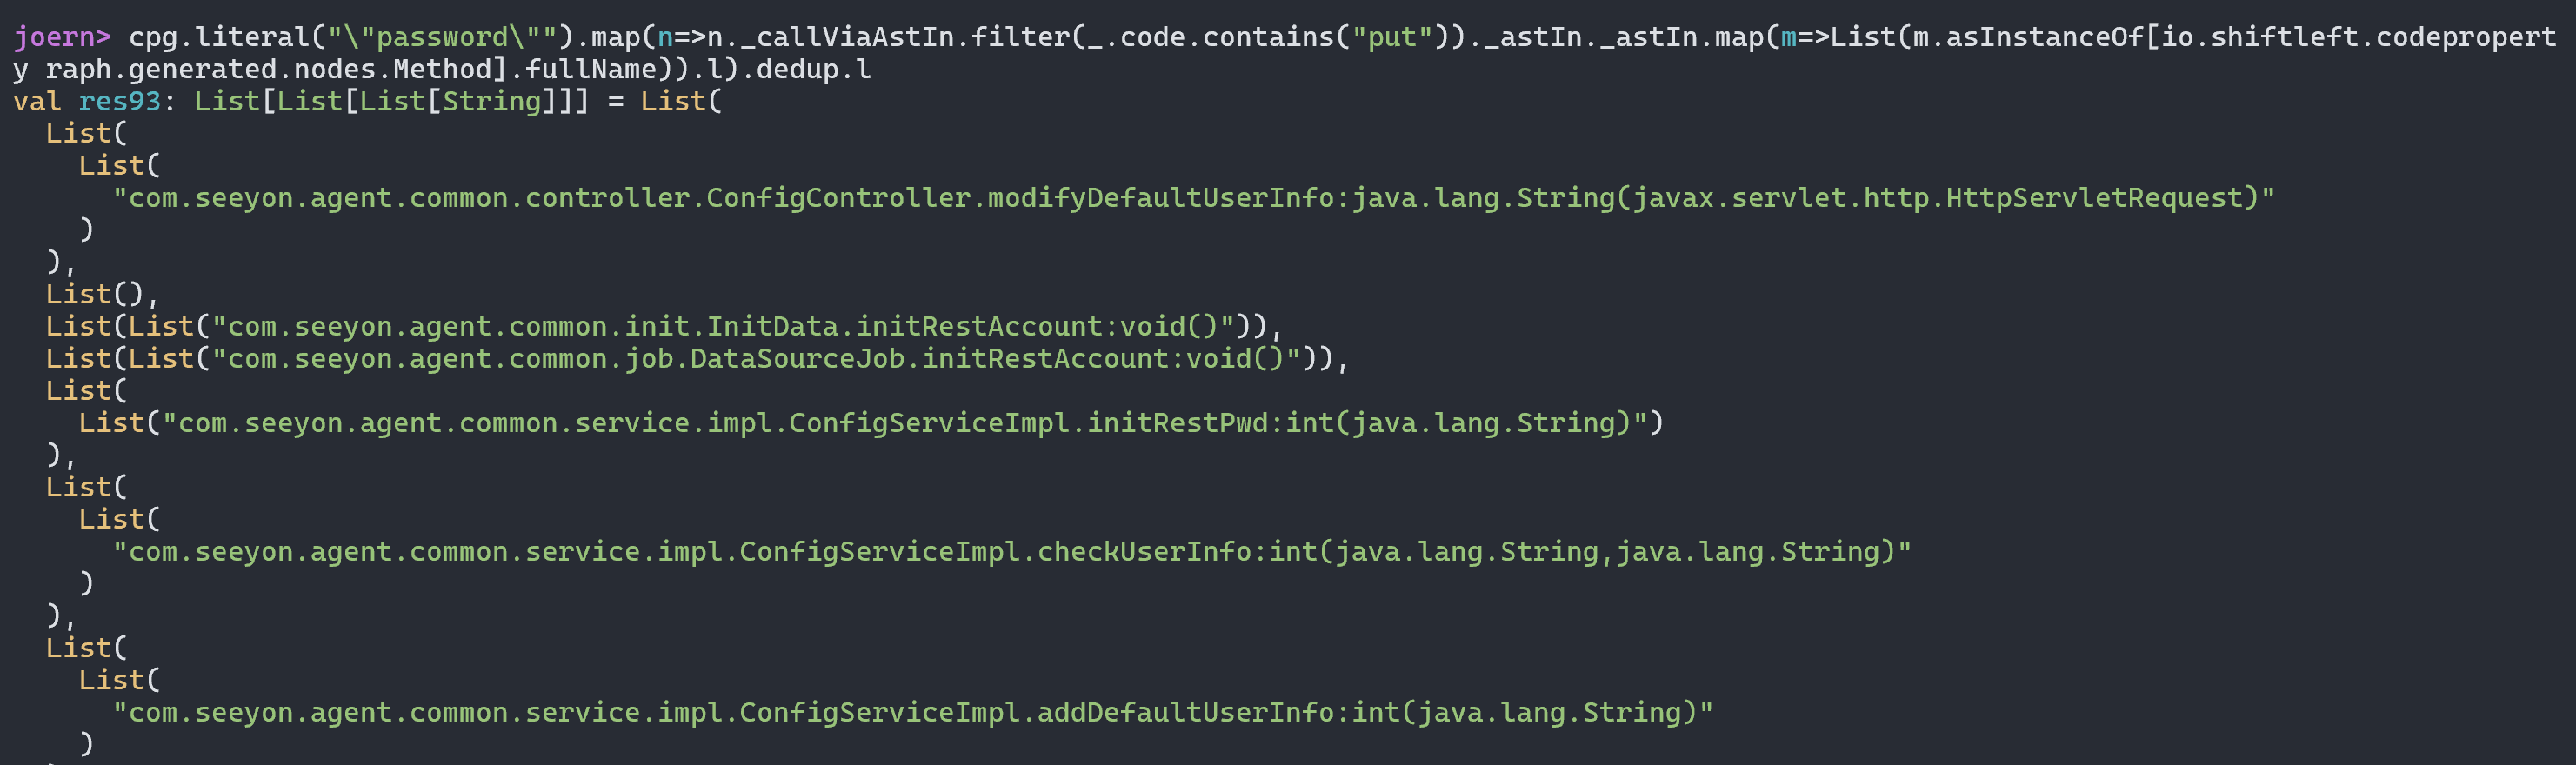
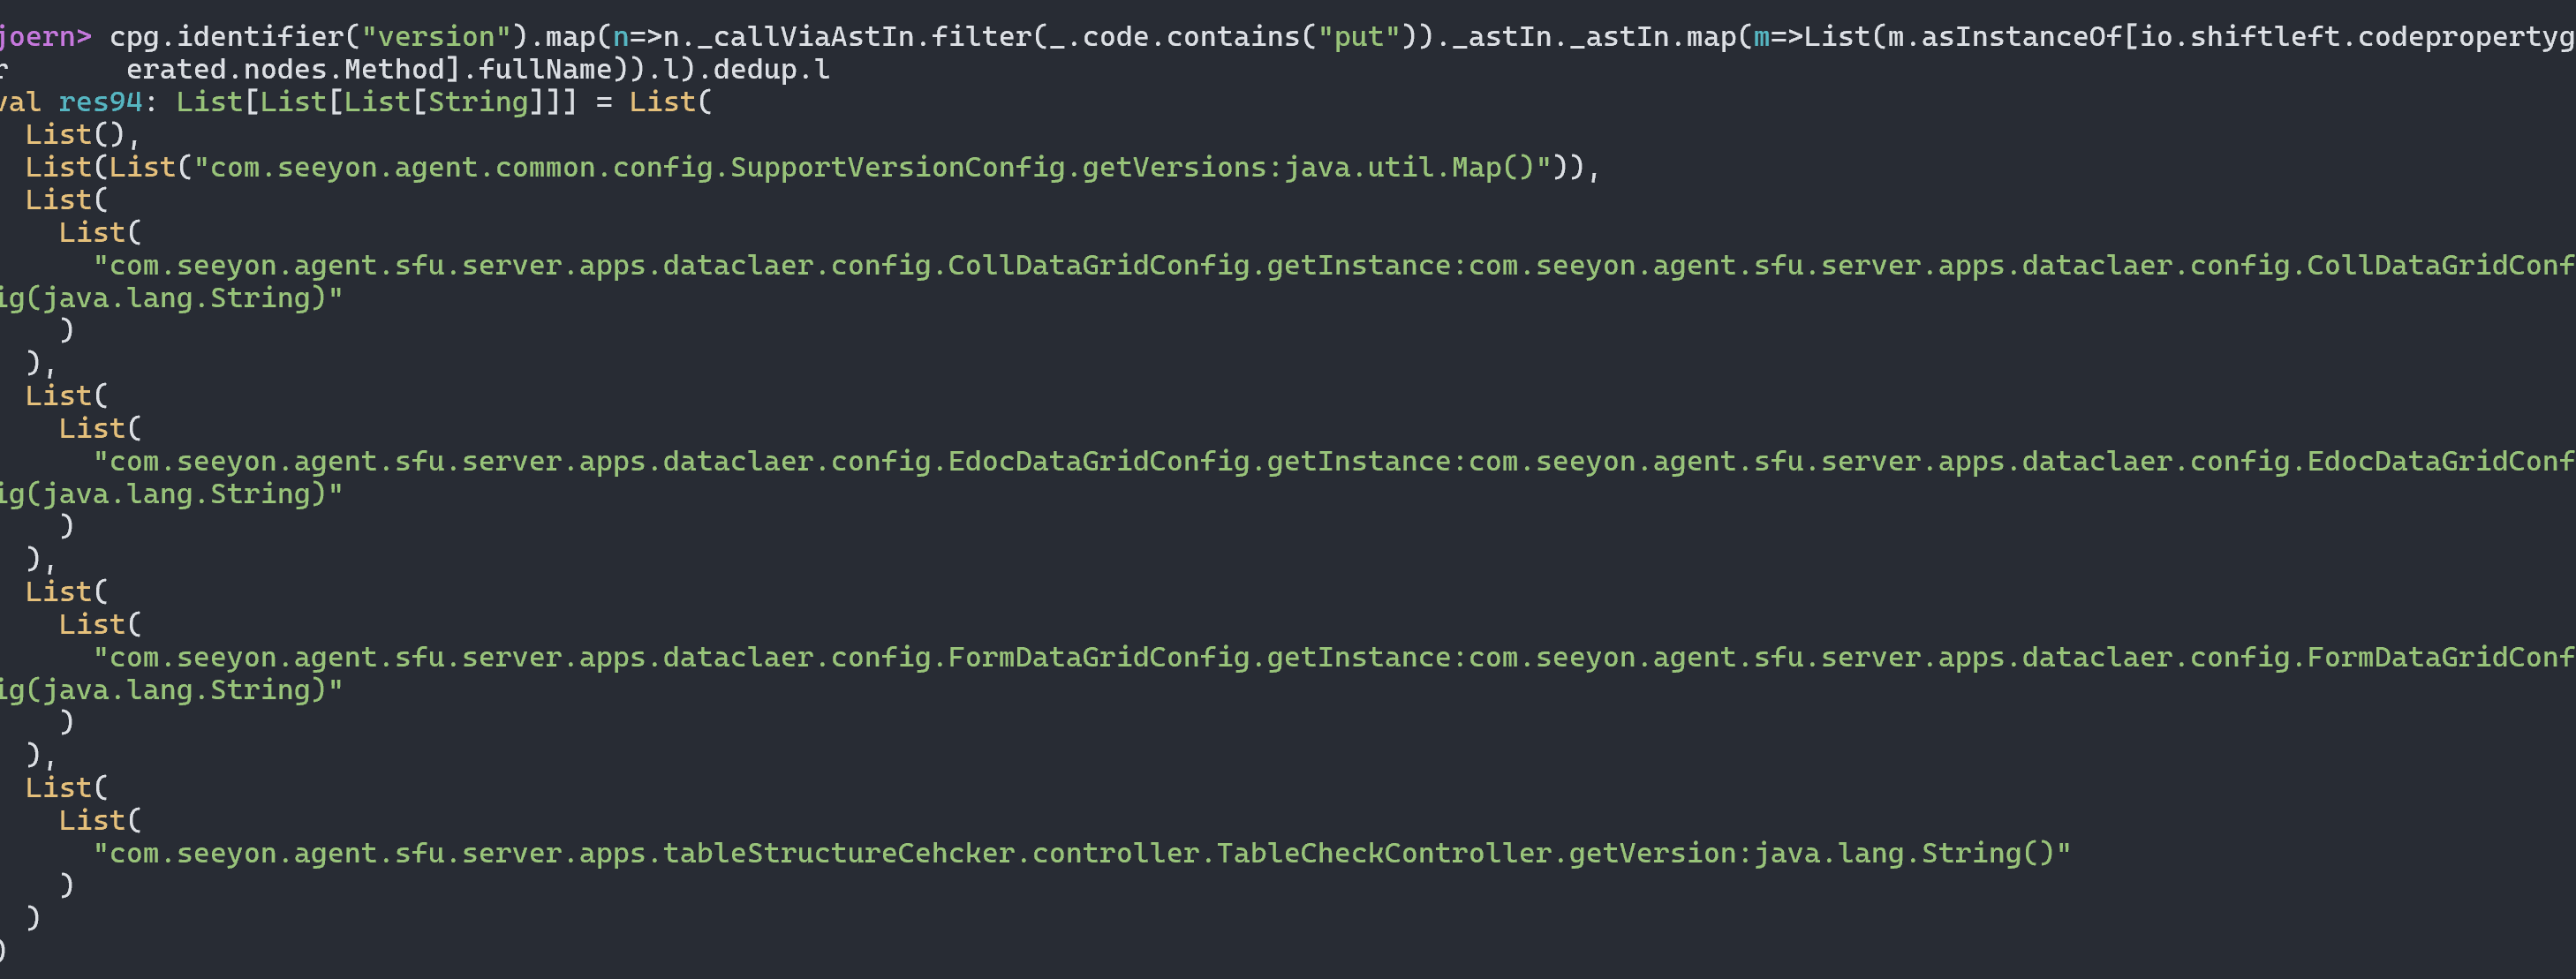


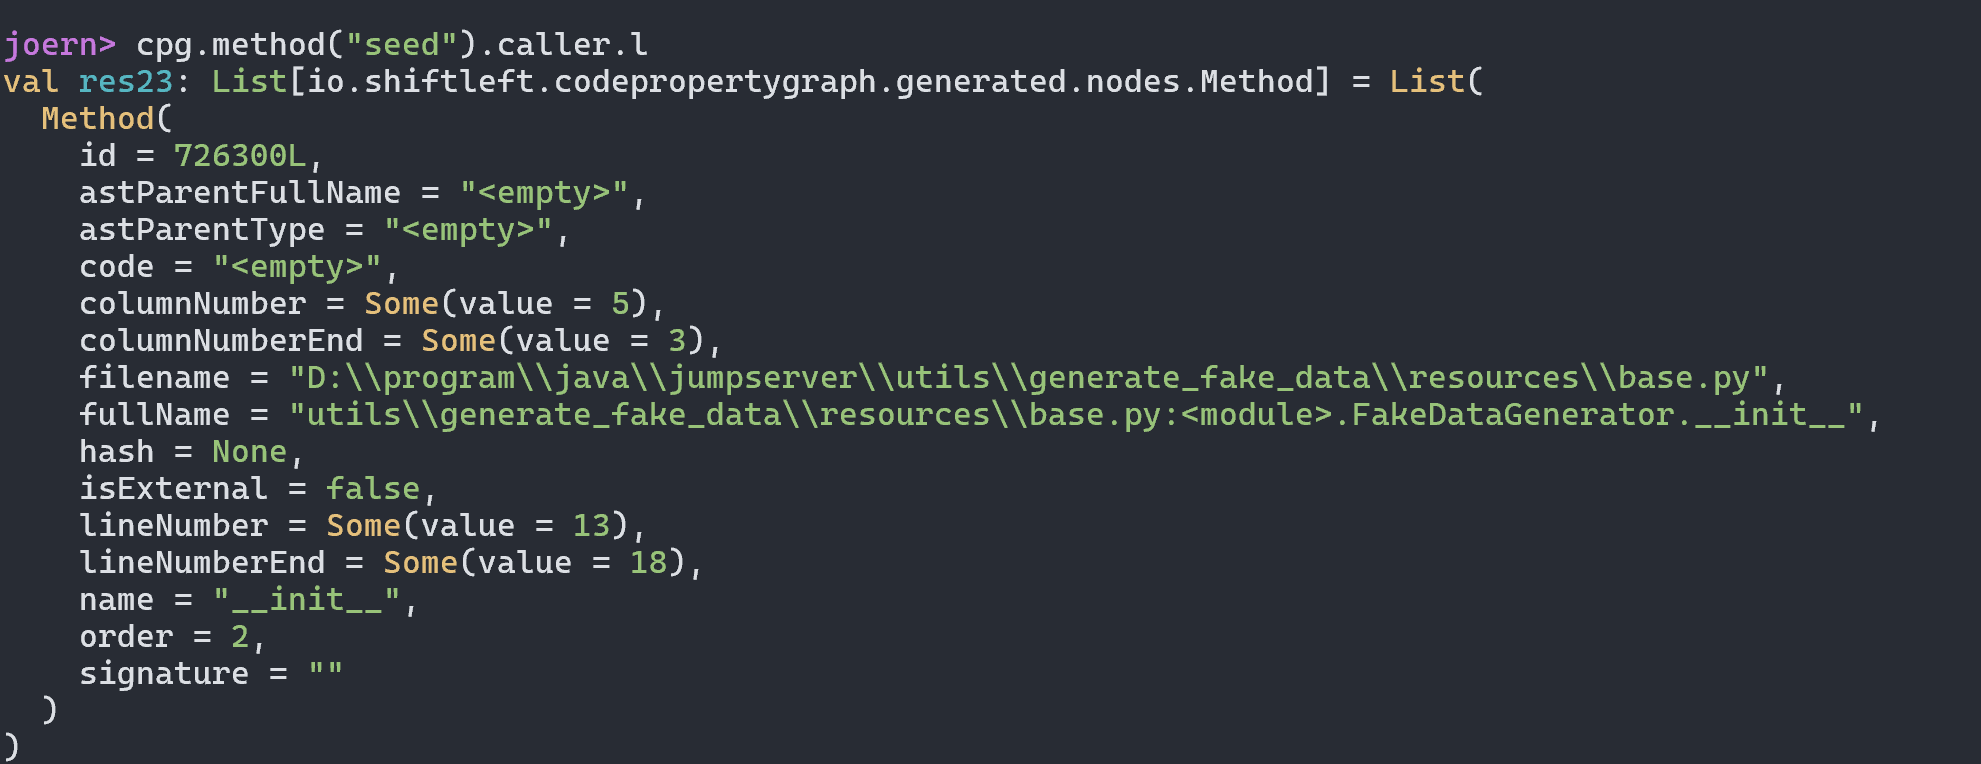

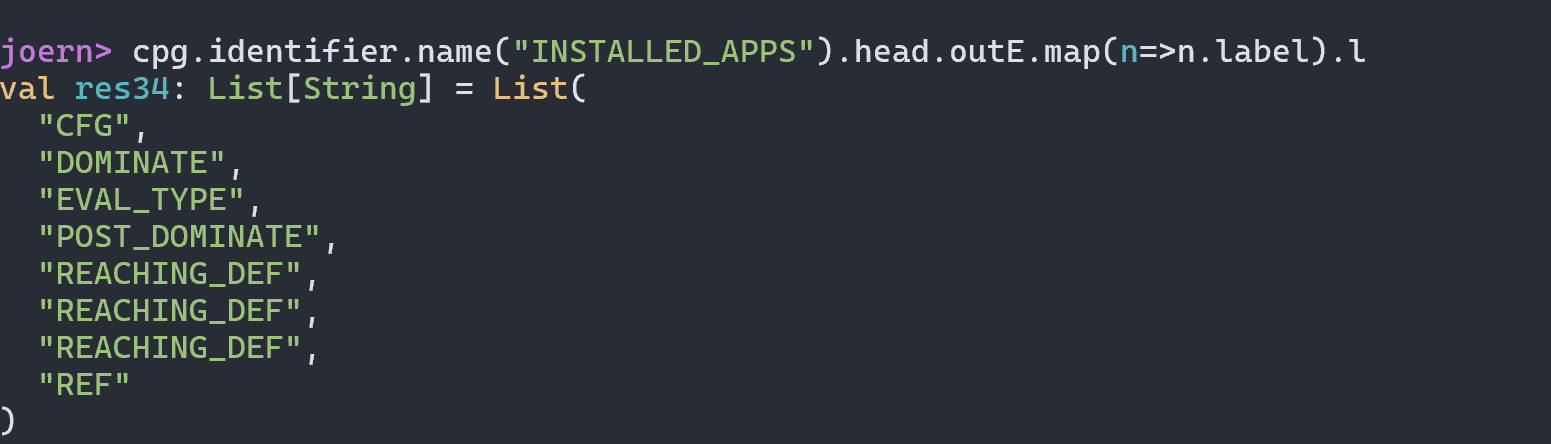
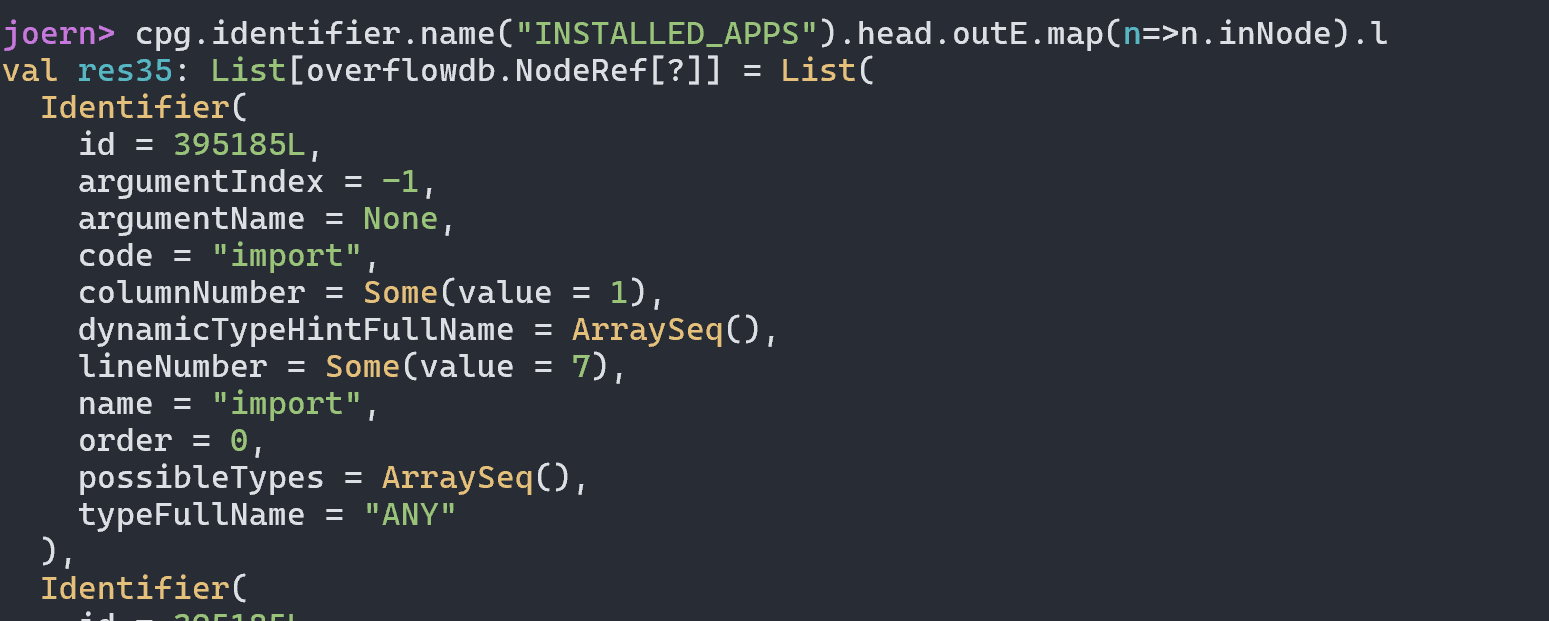

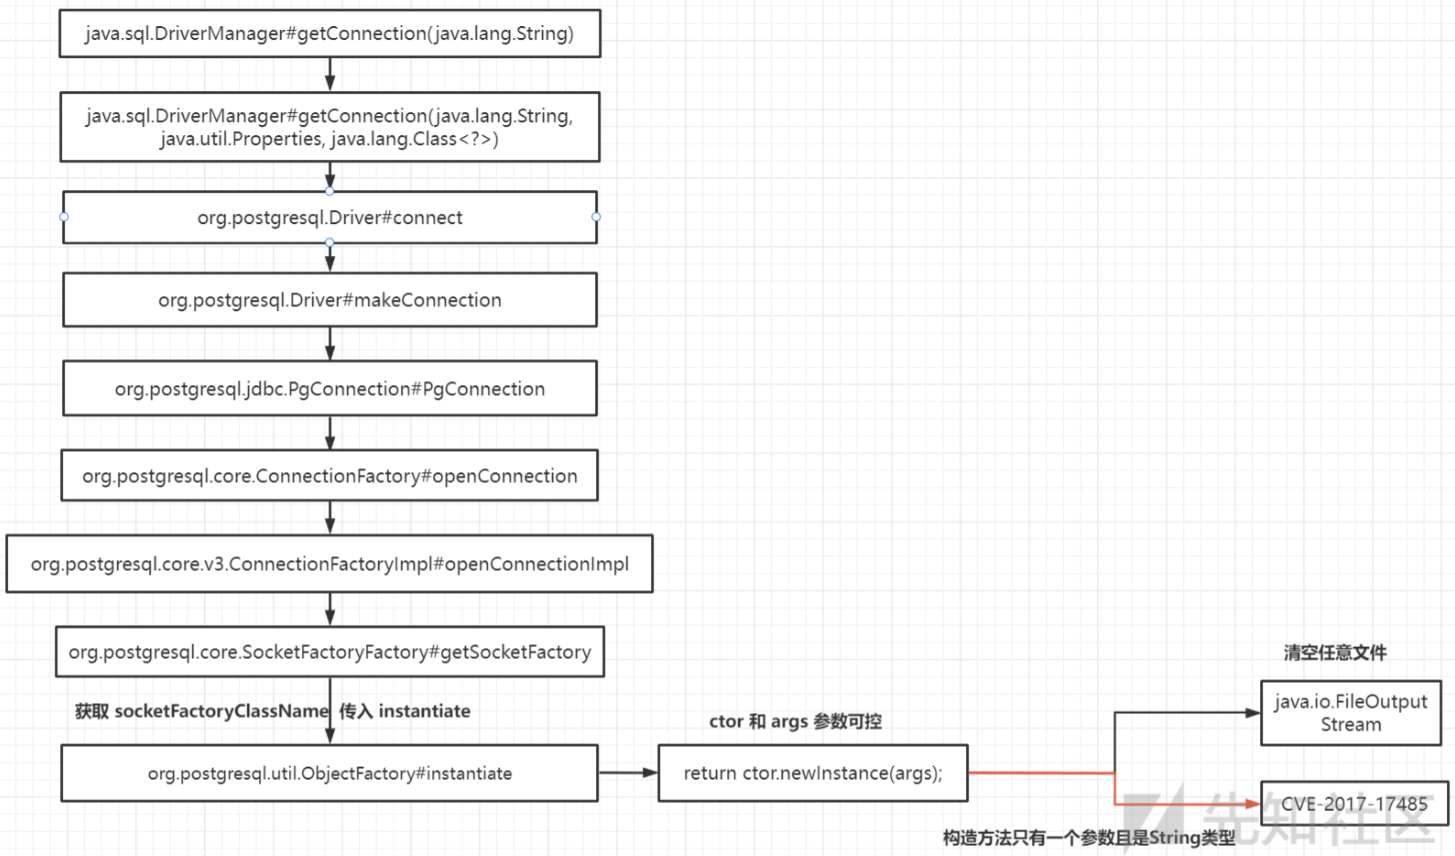

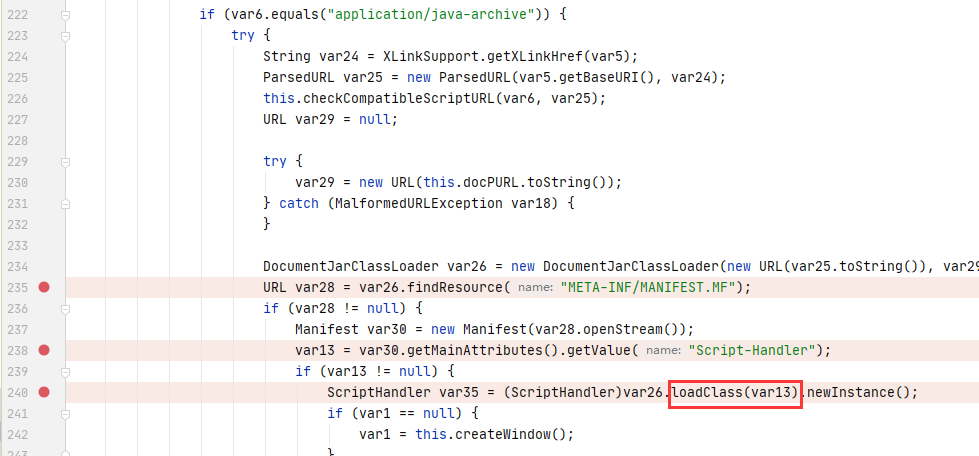
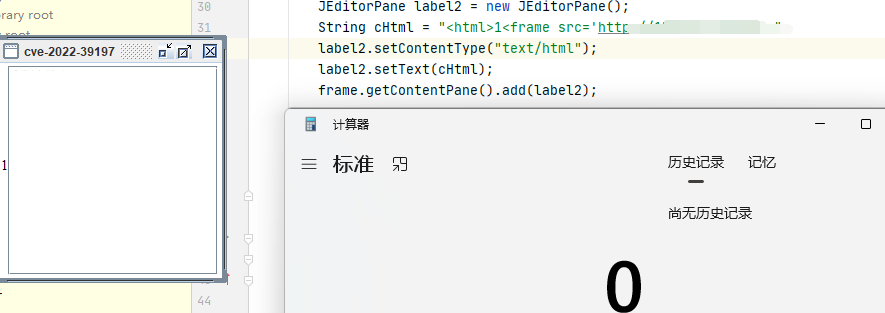
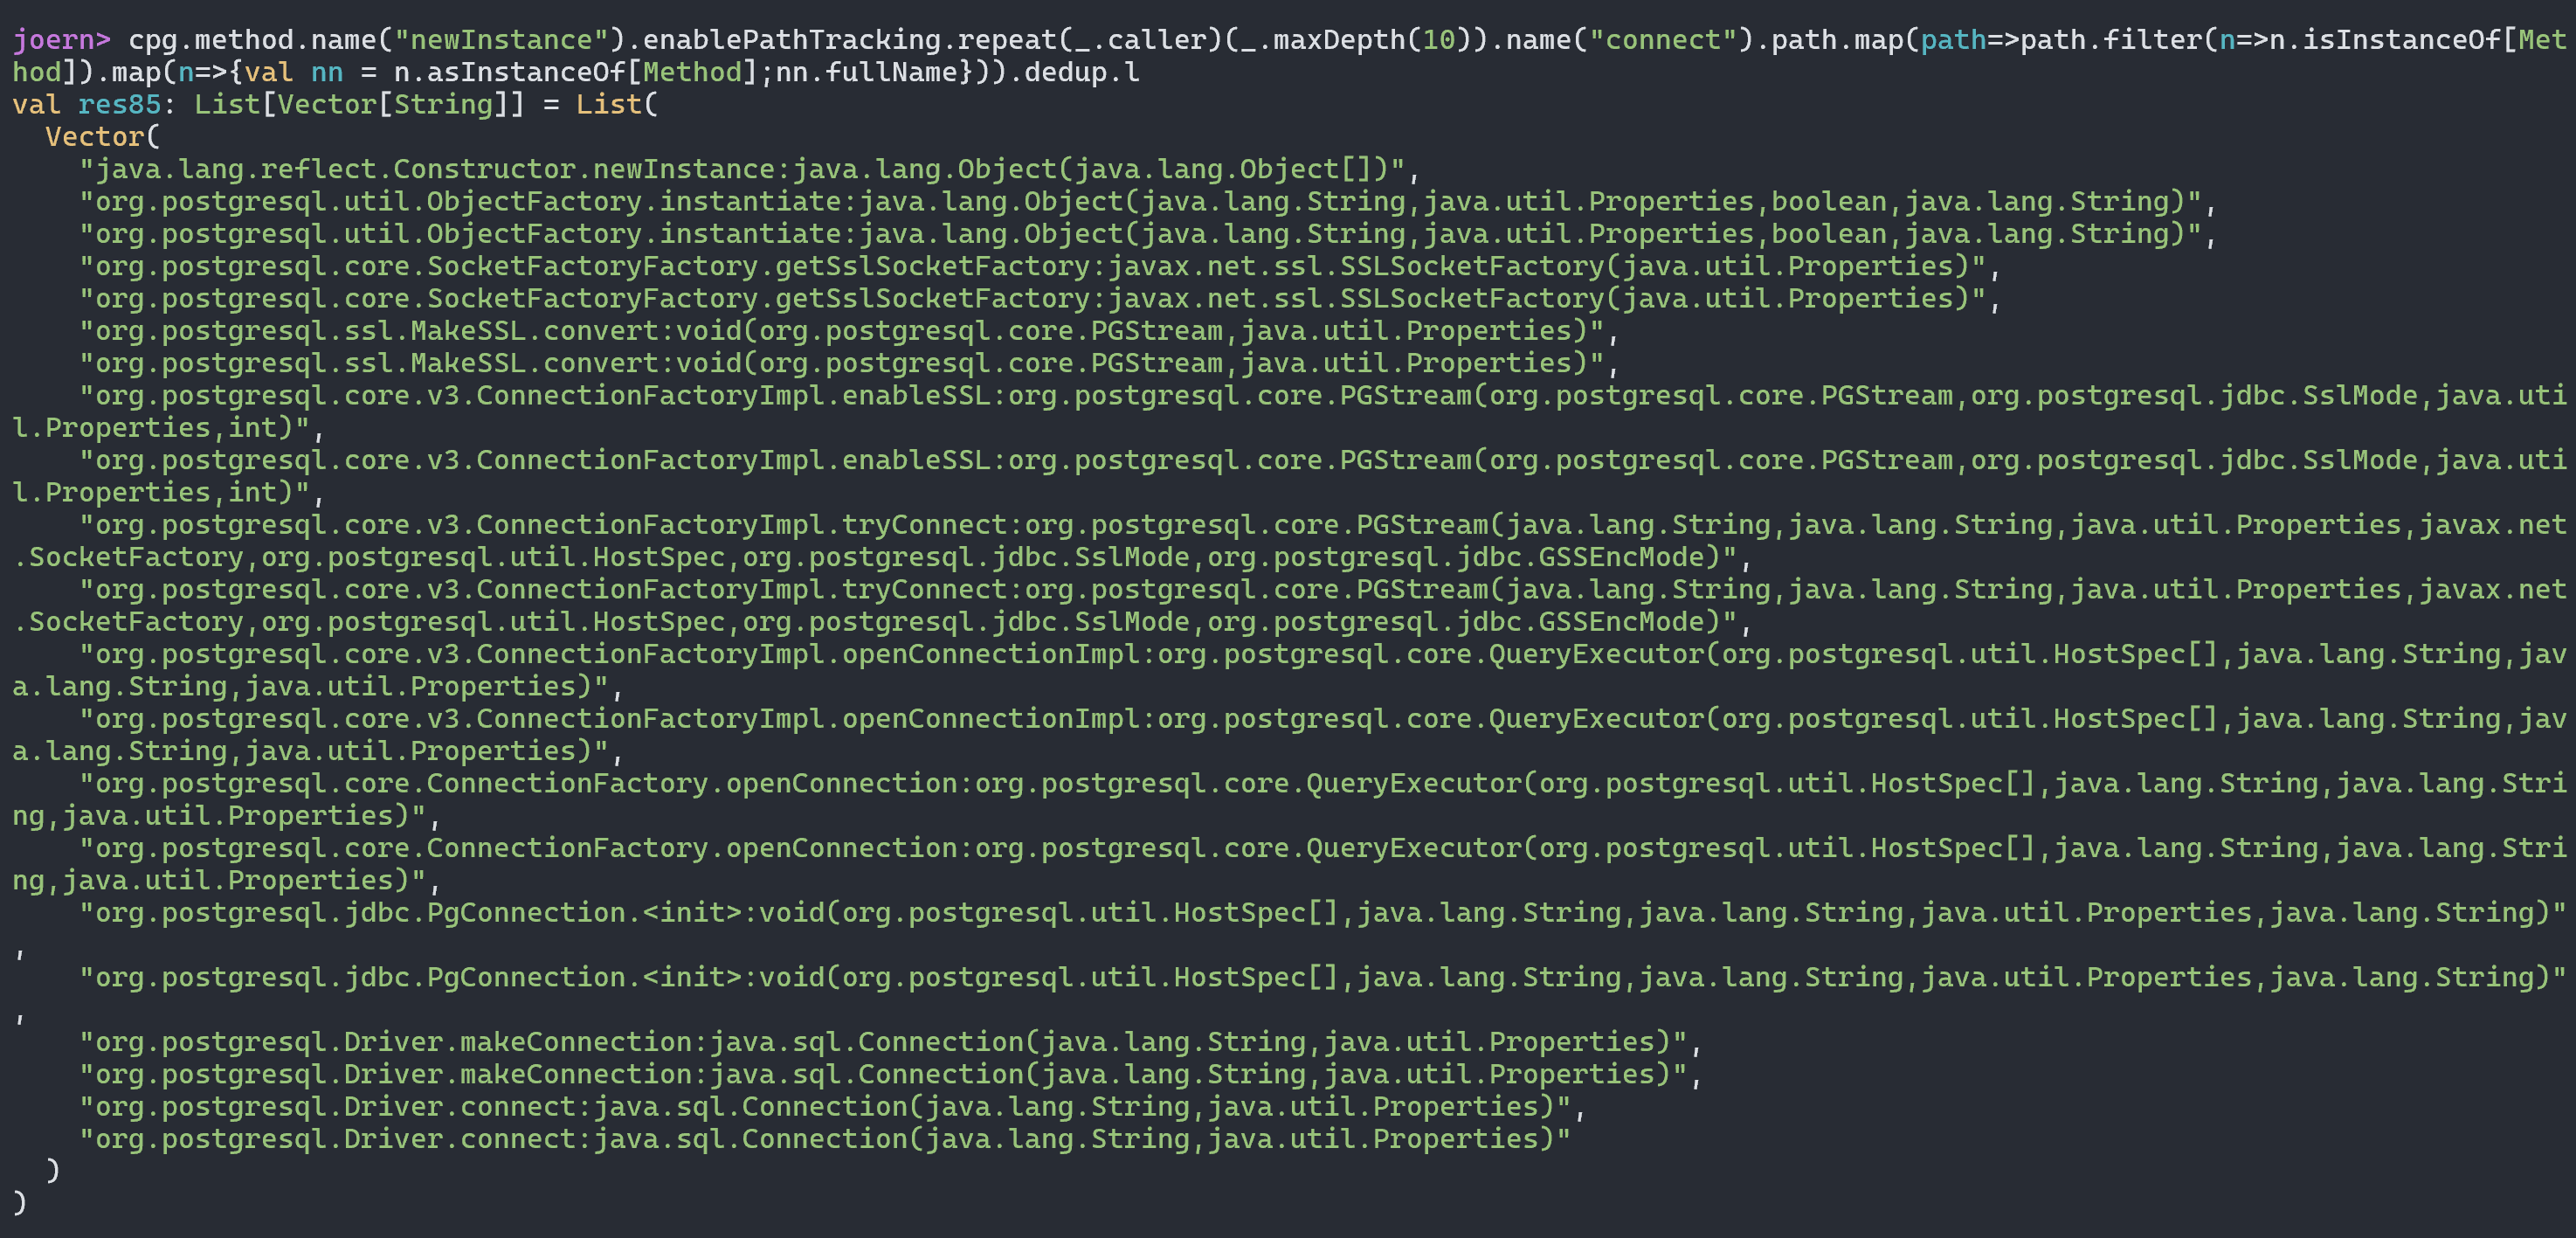
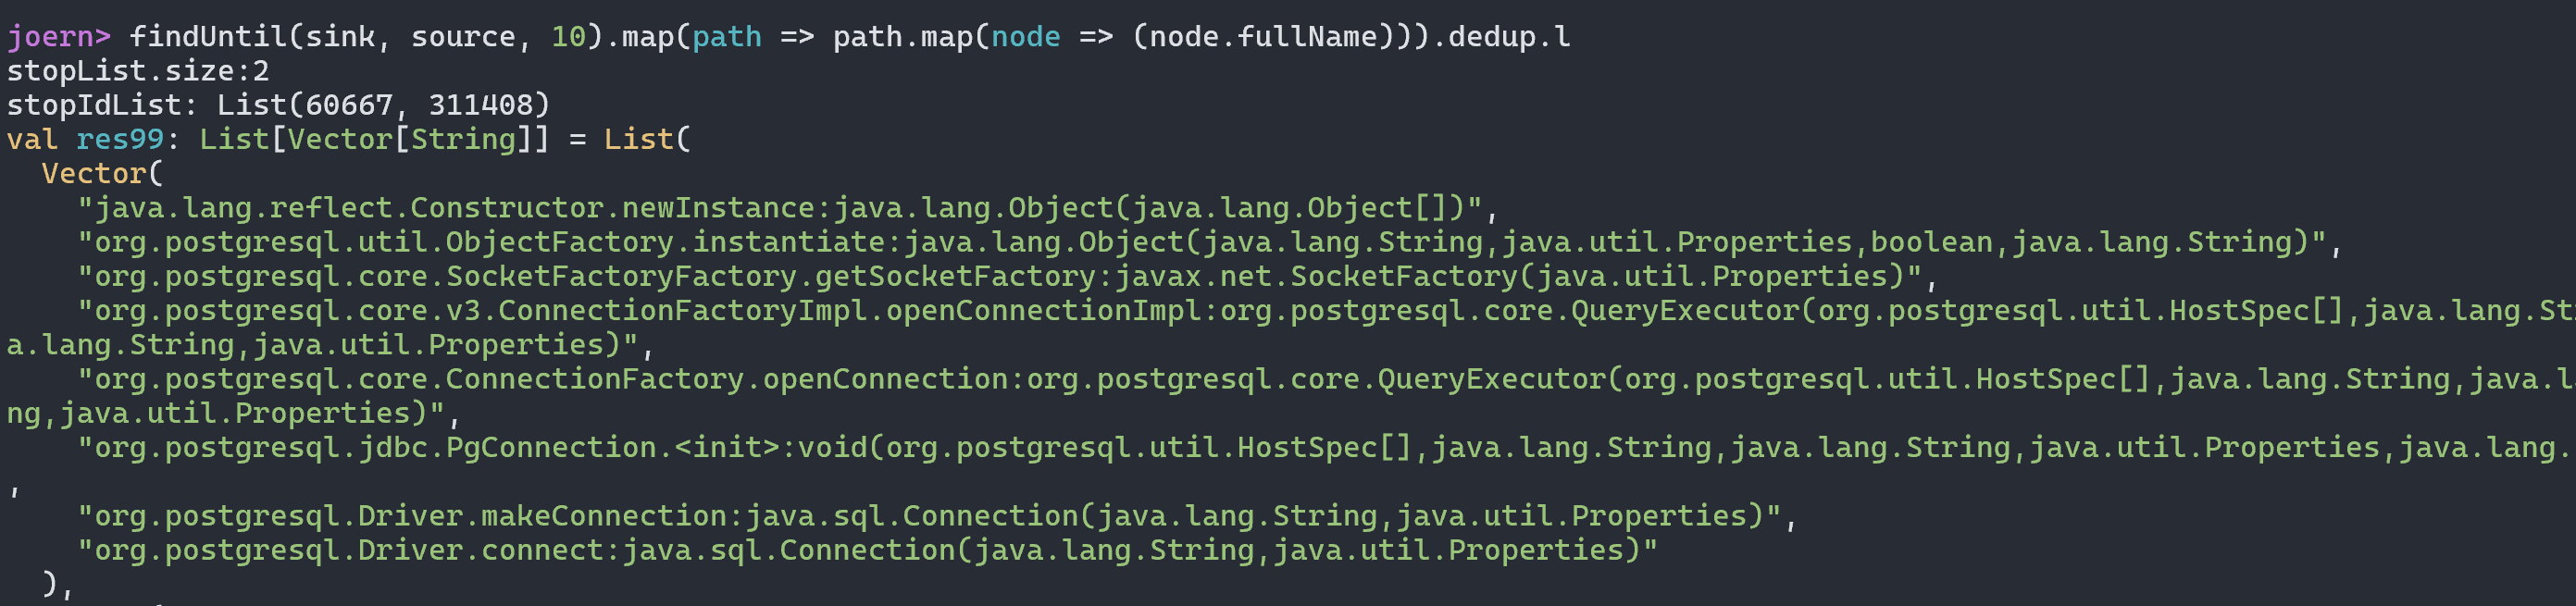
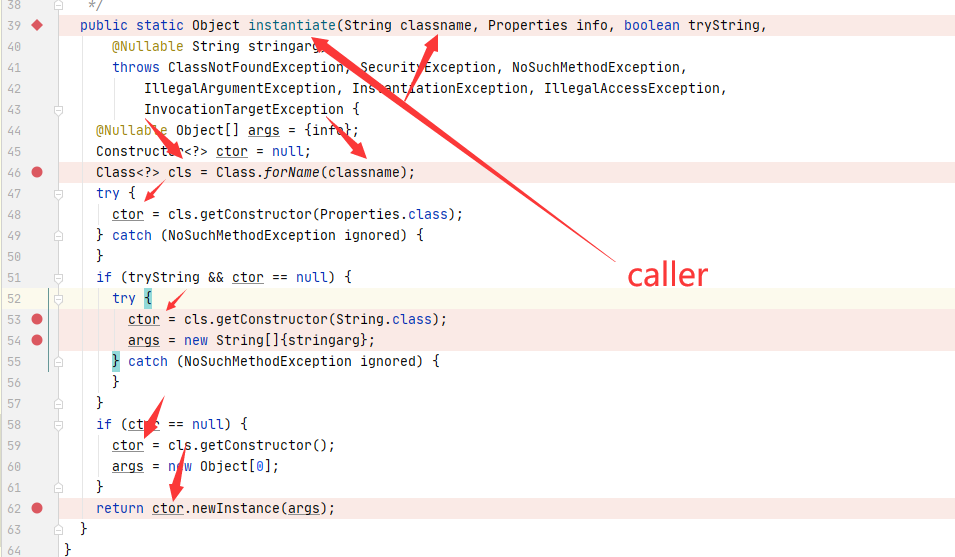
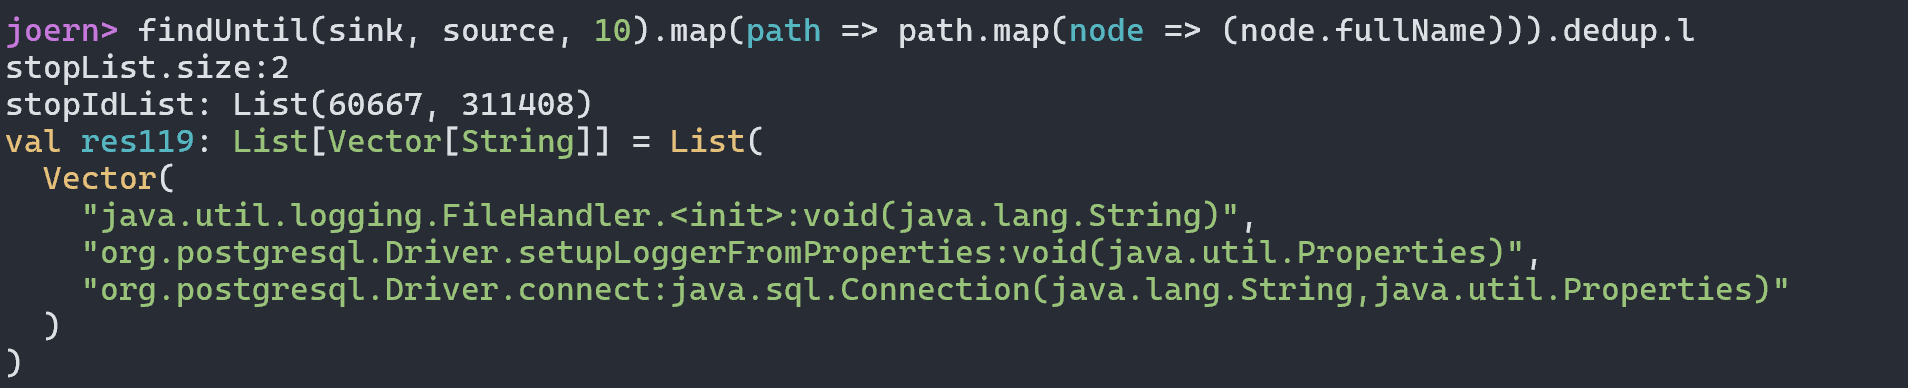
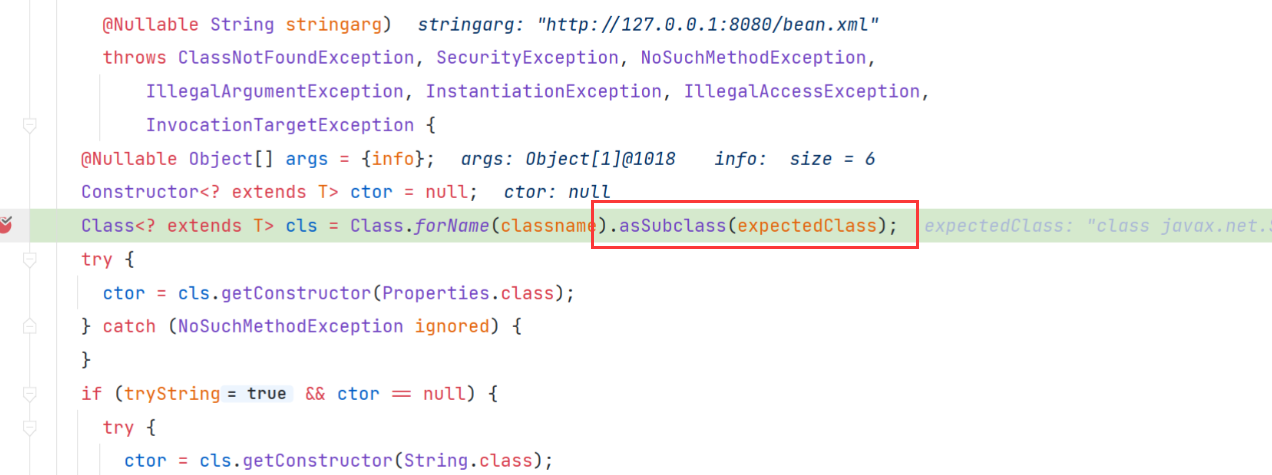
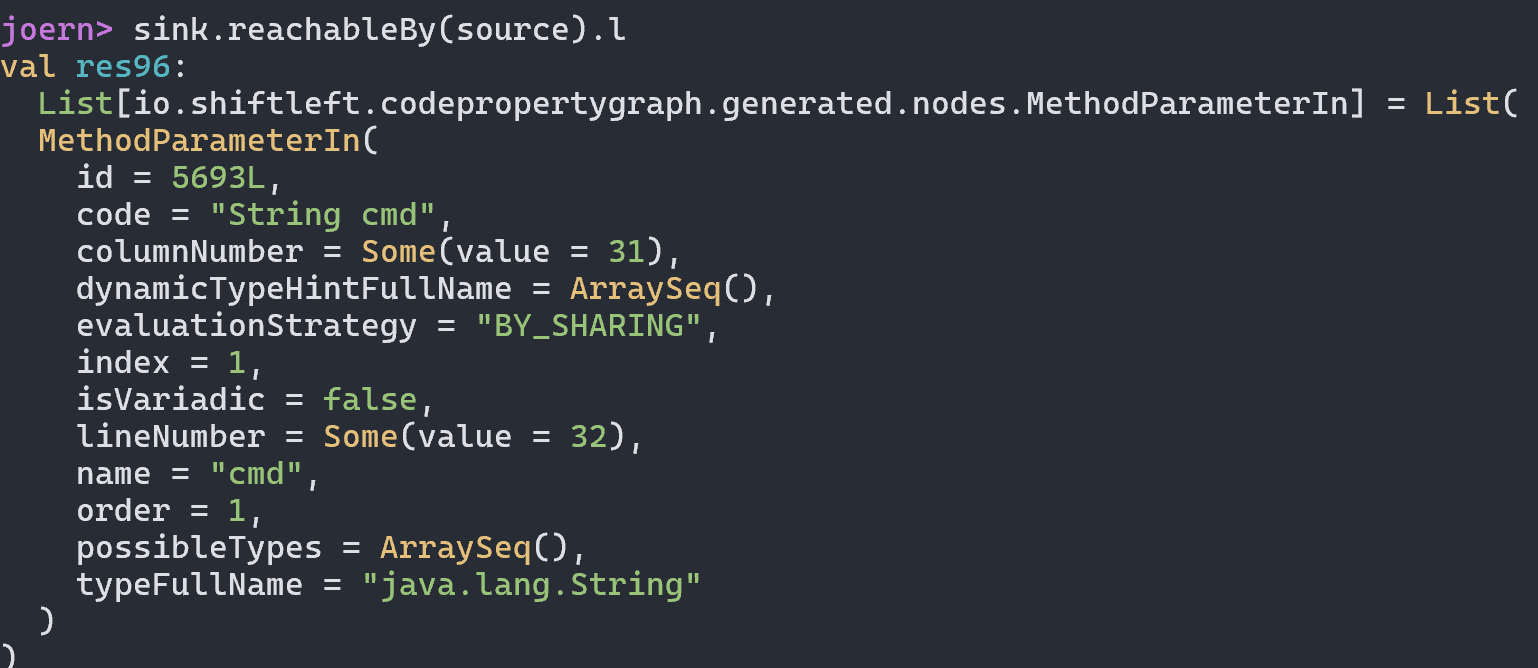
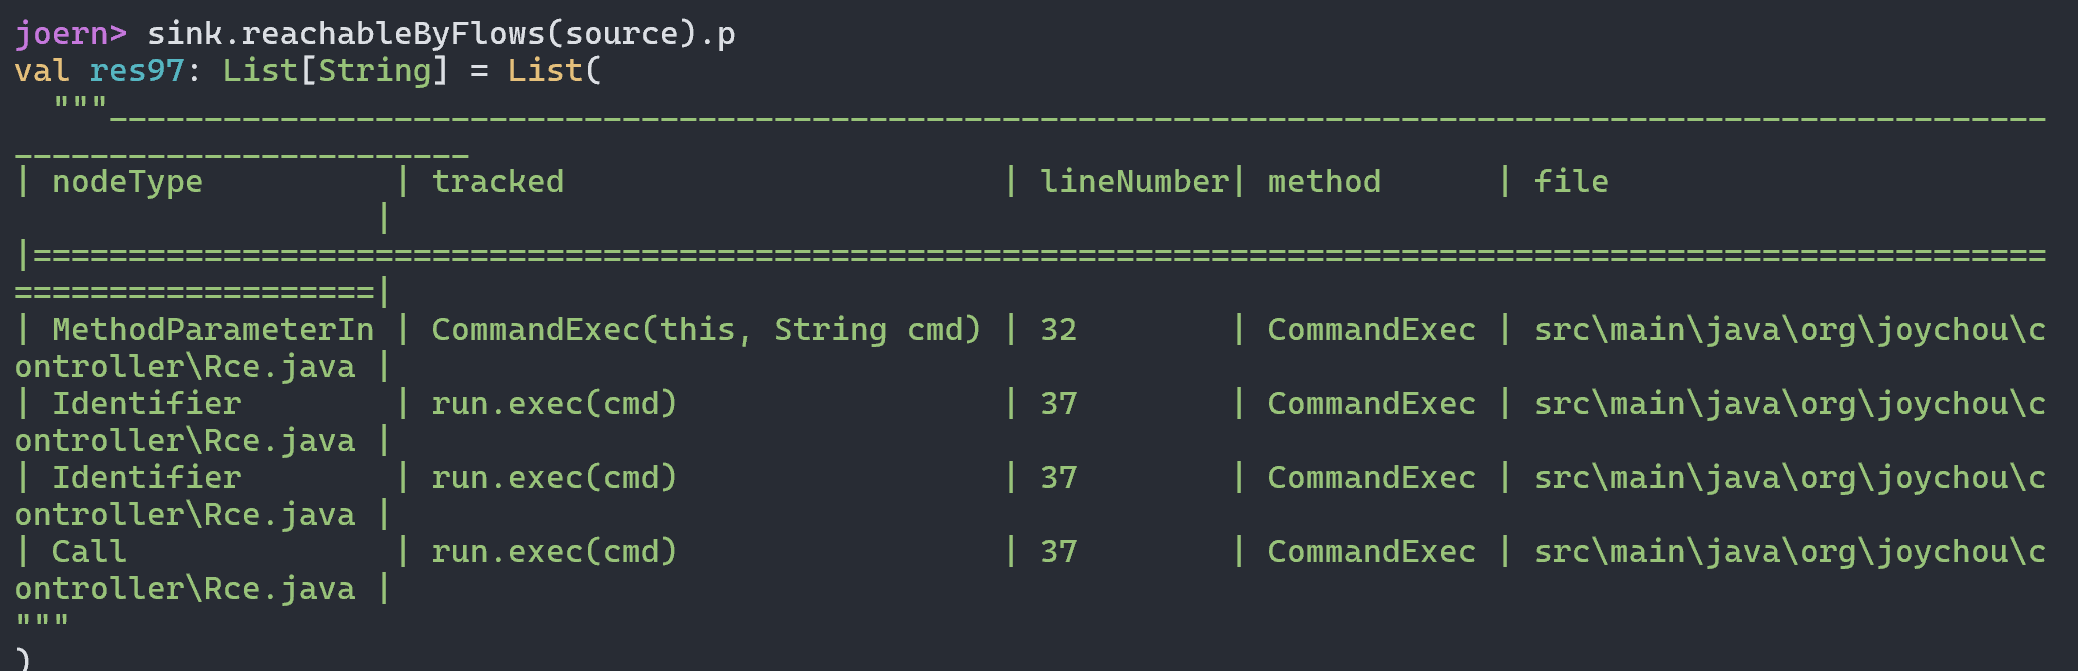
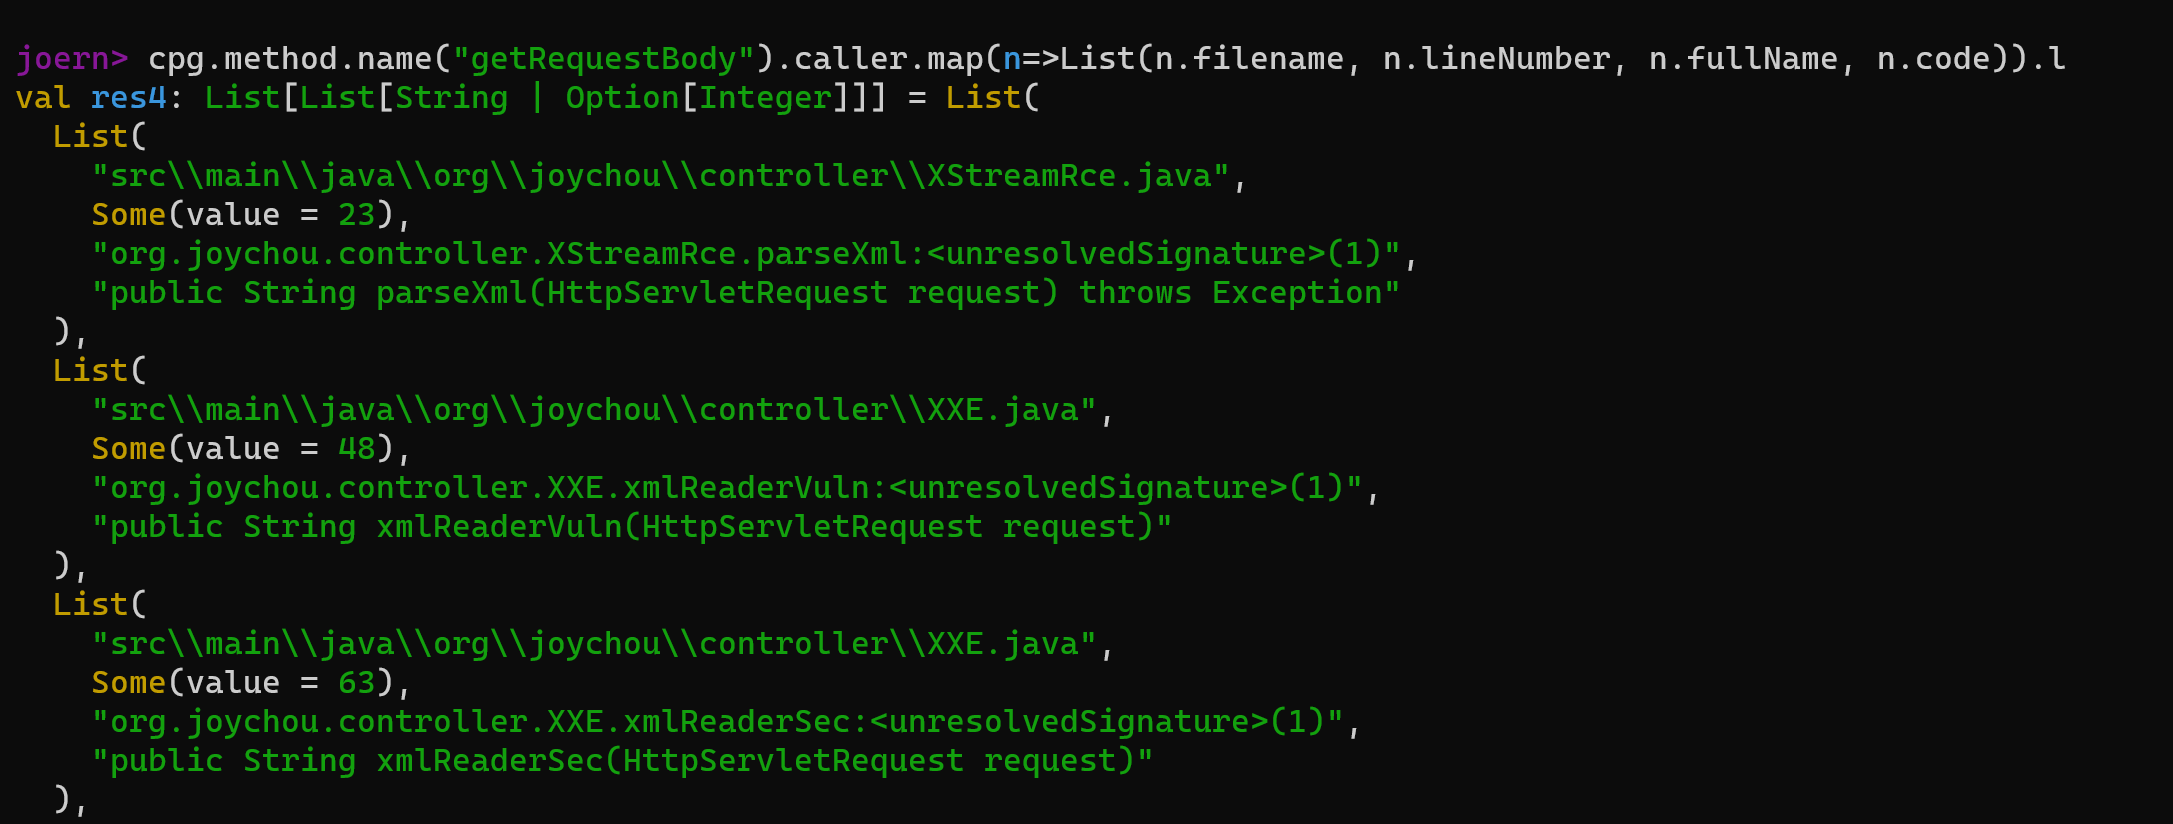
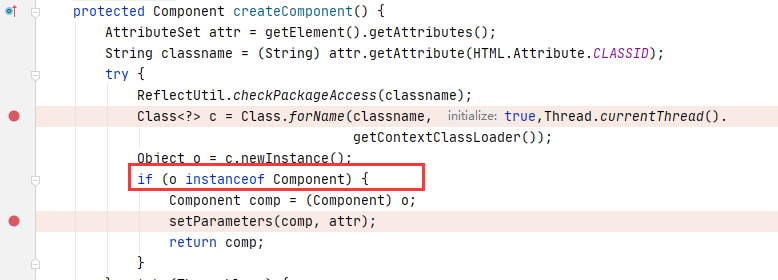
 最终导致漏洞的核心点则是可控的newInstance
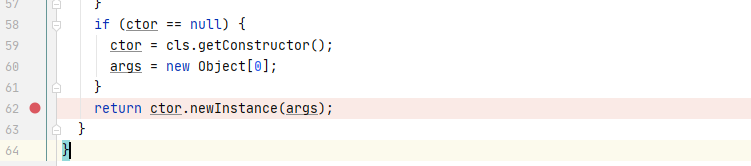


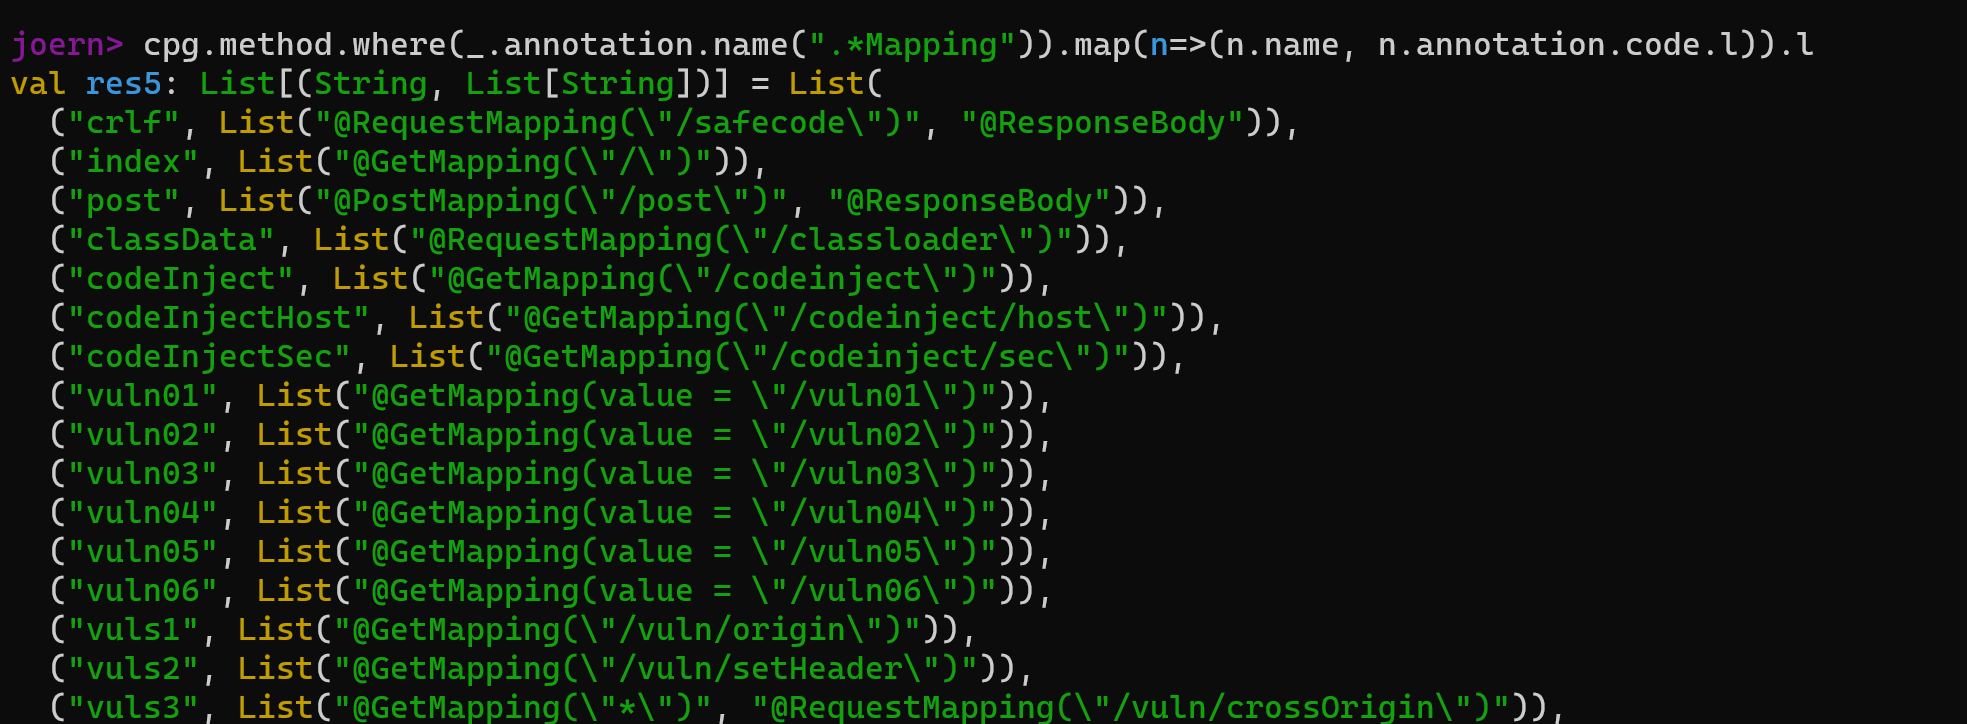


 )
)


 )
)


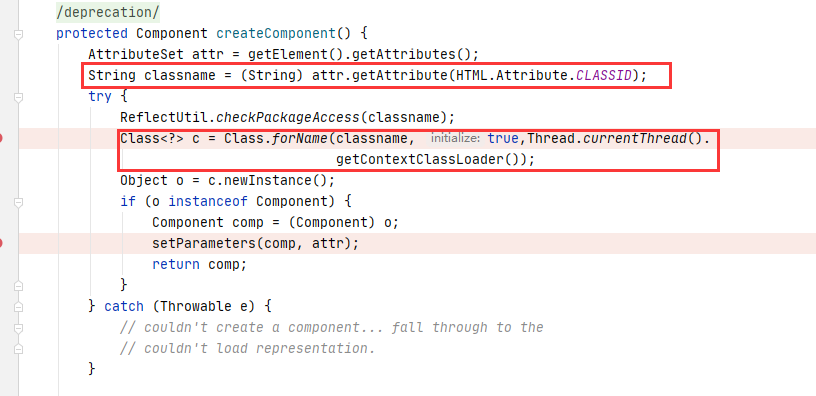


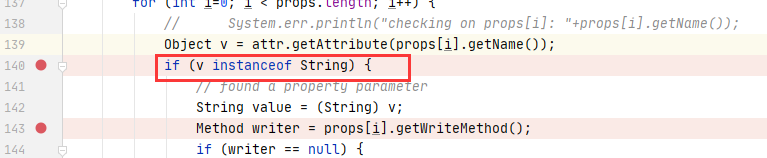

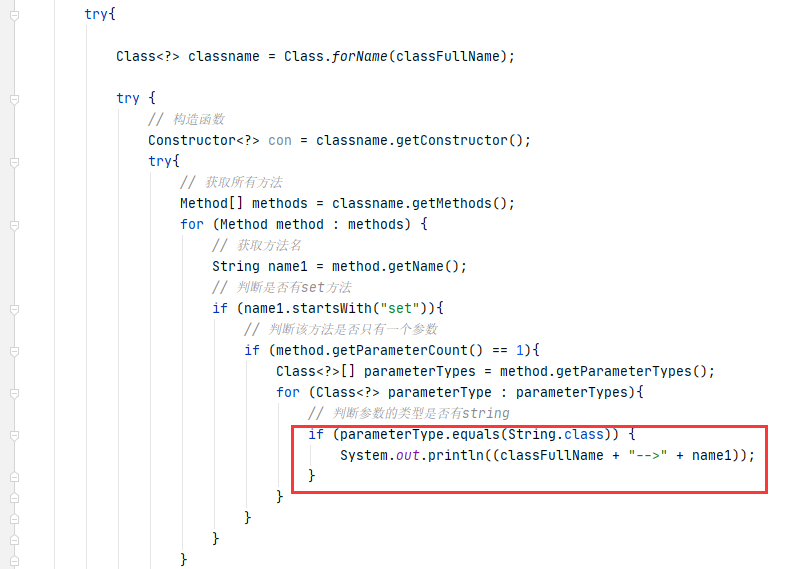
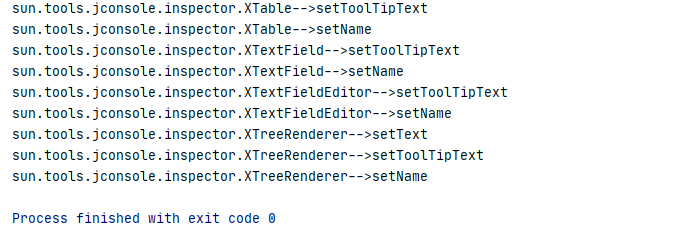
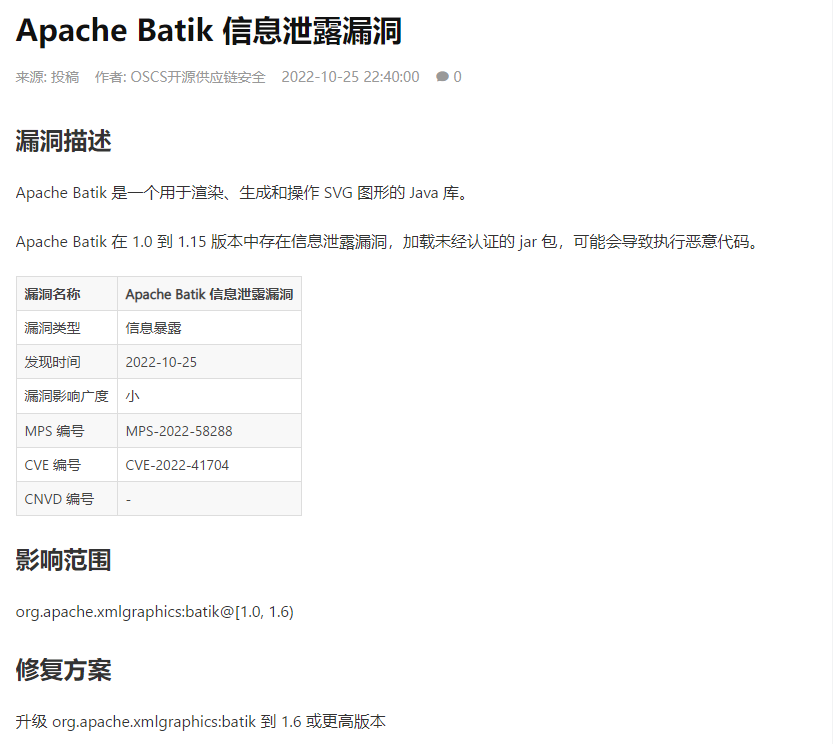
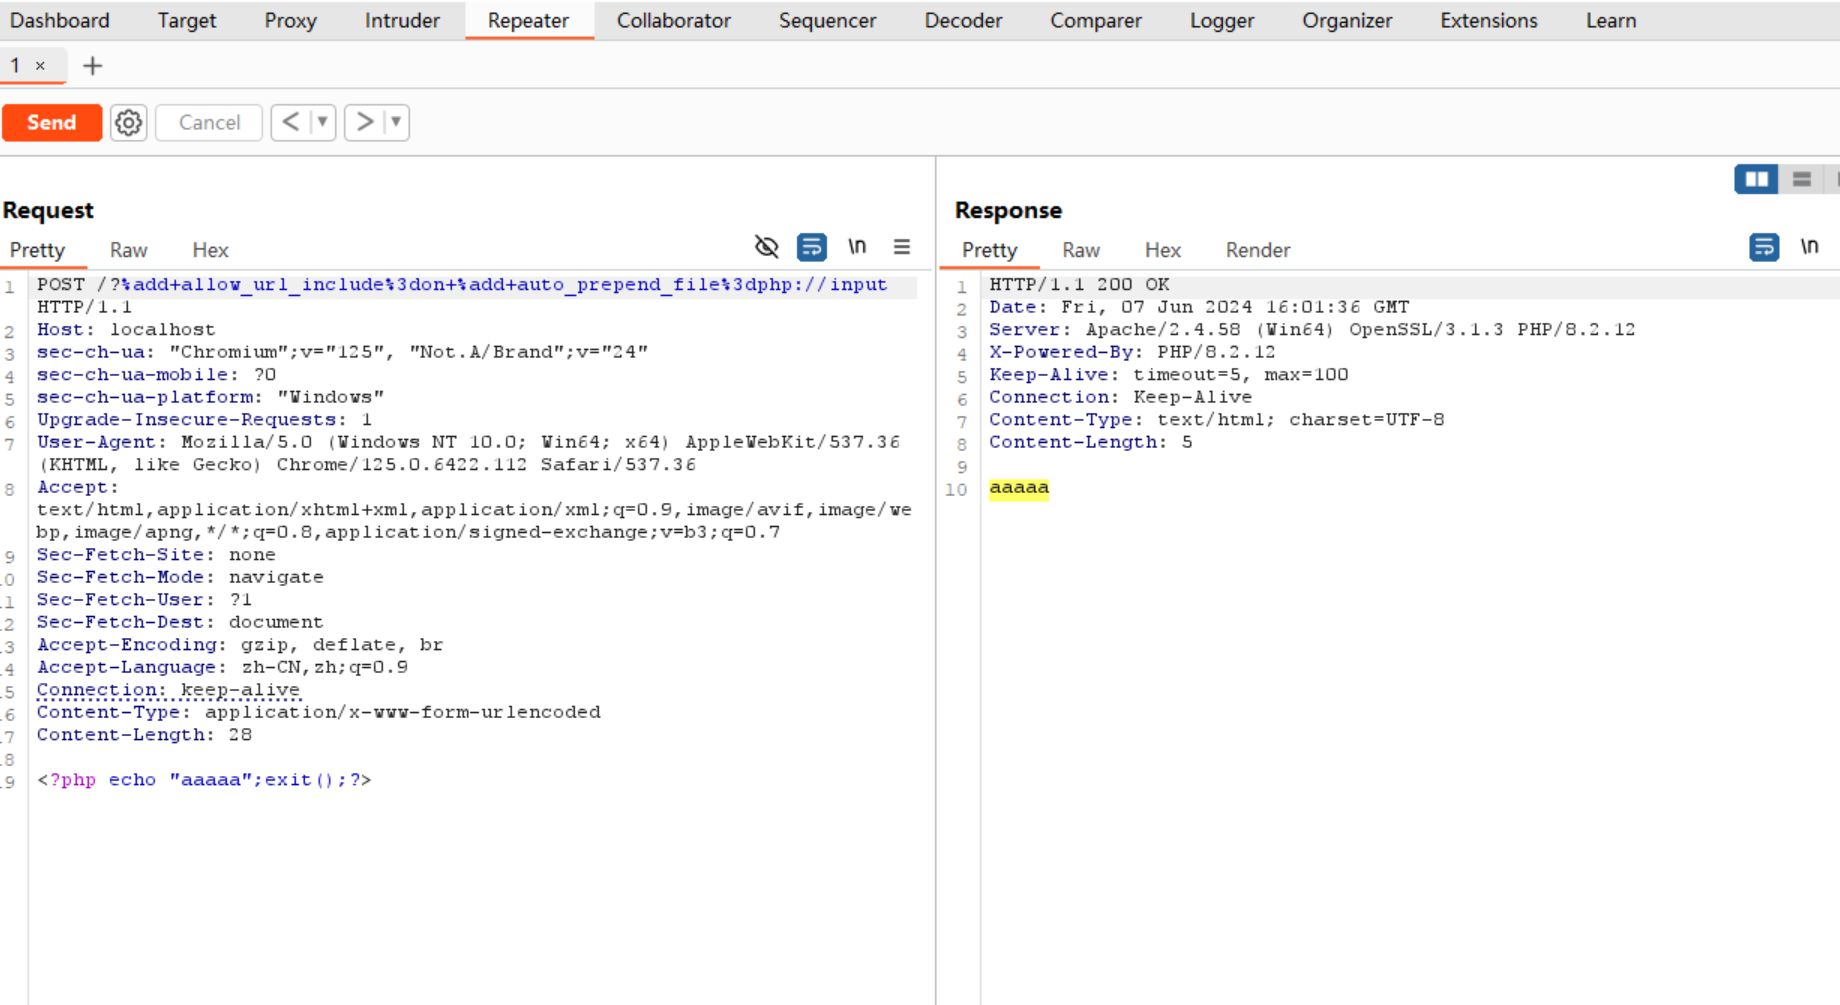
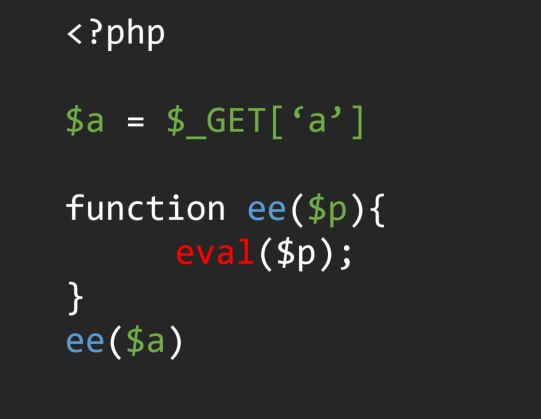
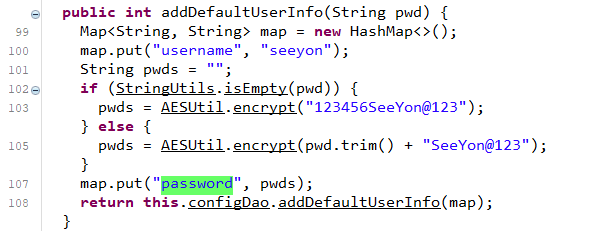
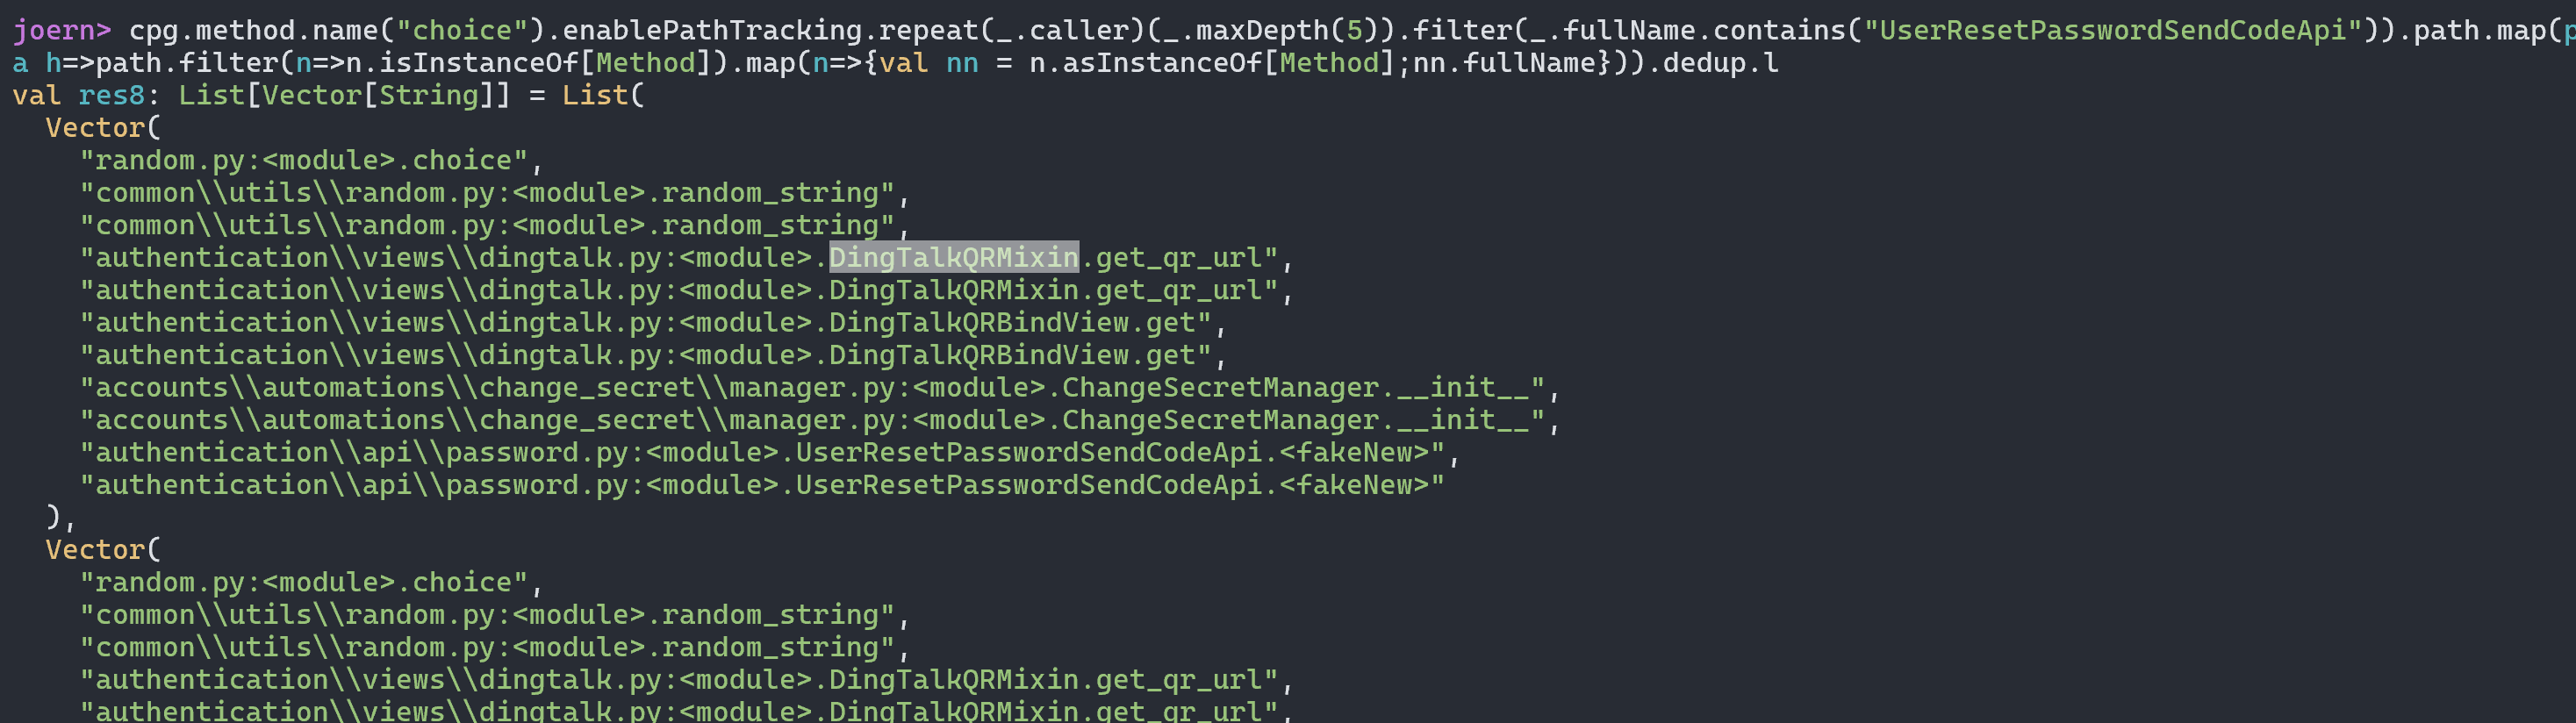
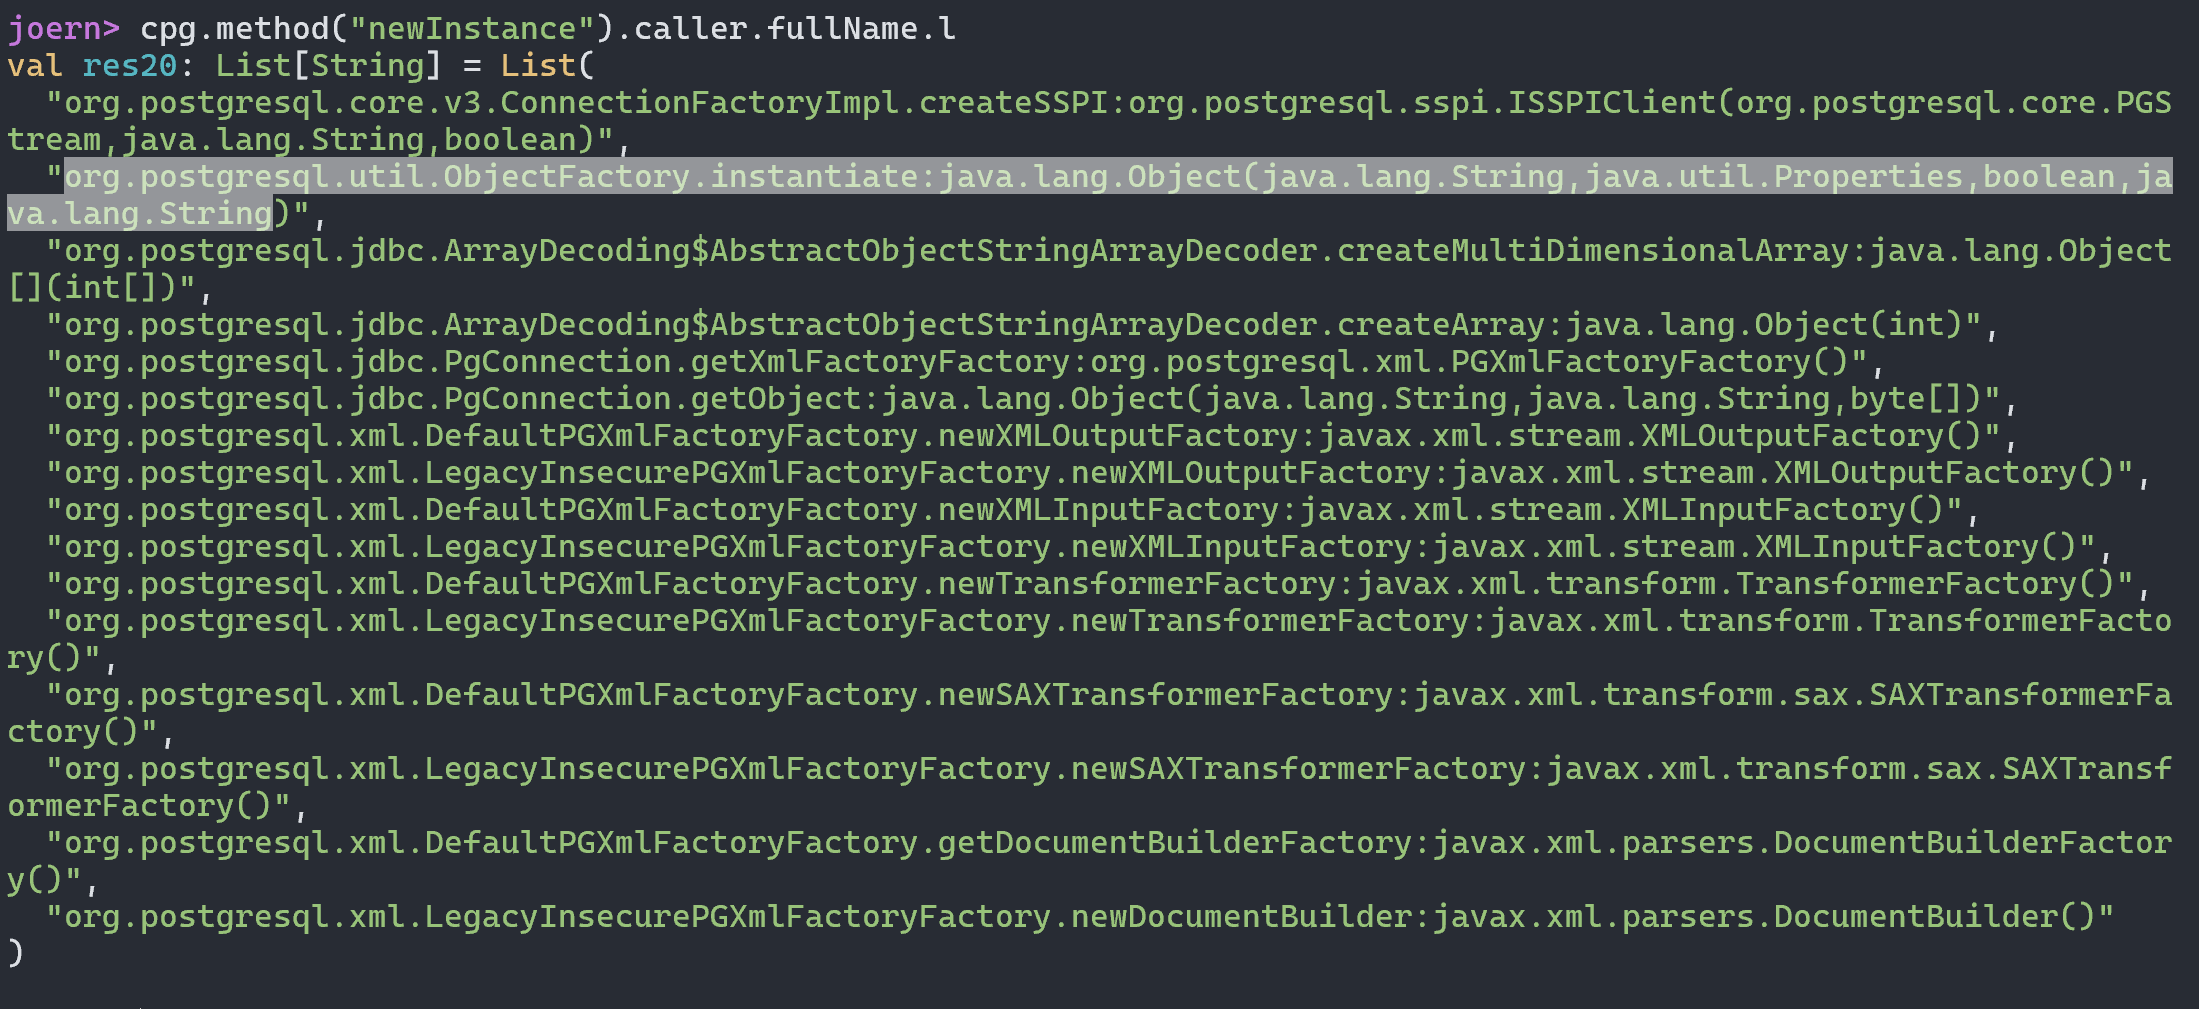
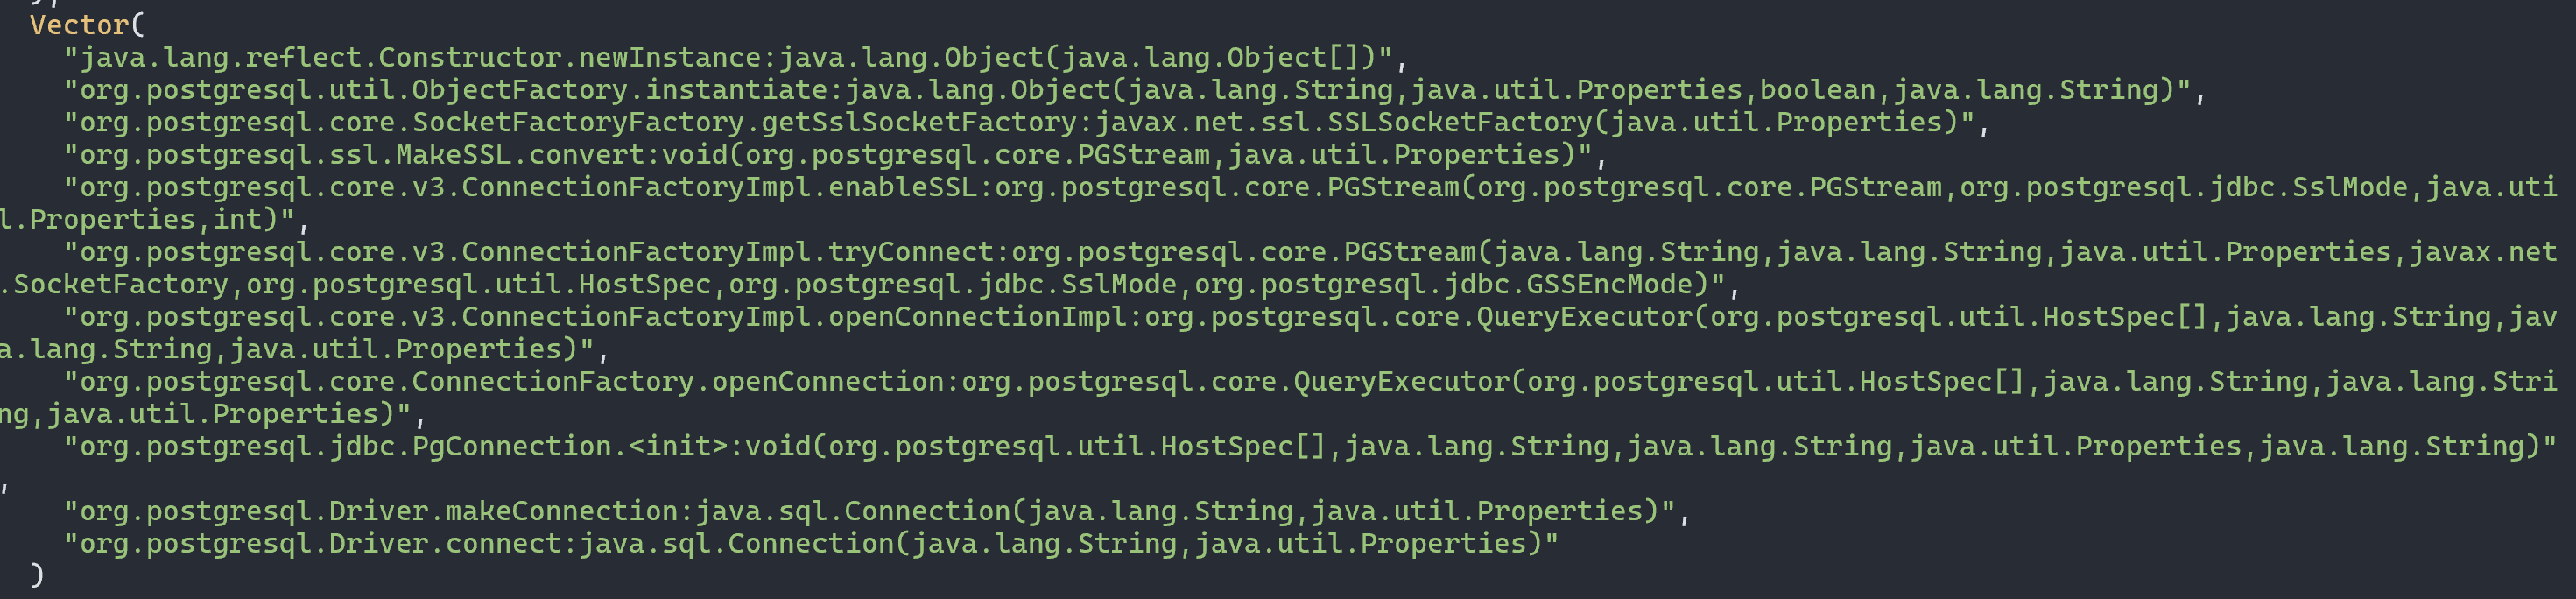
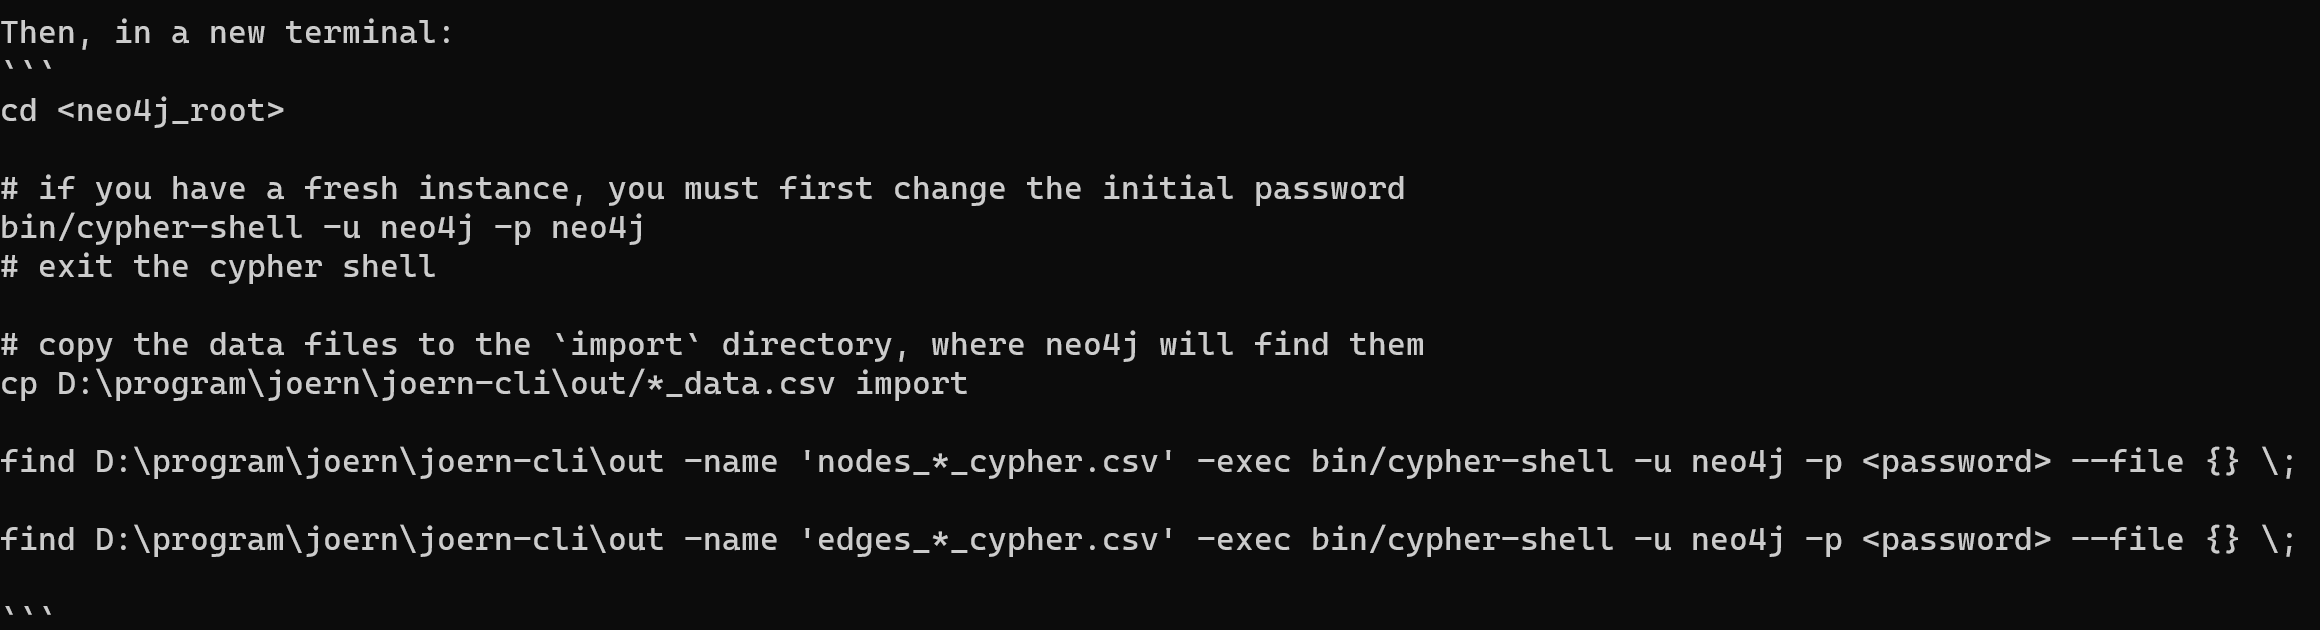
 )直接copy了pang0lin的代码(0v0),扫描所有类满足条件的方法